The data in your QuickBooks company file contains some of the most sensitive information on your computer. Make sure it’s secure.
Your customer list is gold. And those Social Security and bank card numbers in your payroll, client, and vendor records need to be protected from intruders and only viewed by authorized employees.
It’s not just large corporations and financial institutions that get hacked. That’s what the bad guys want you to think. In reality, small businesses are often the victims of data breaches because their owners think they’re immune from data theft and destruction.
Even if you’re password-protecting your PCs and running antivirus and anti-malware software, there’s more you need to do when it comes to your accounting records. Here’s what we suggest.
Restrict access by setting up user permissions.
If you have multiple staff members using QuickBooks, don’t share the same user name and password. That obviously gives everyone access to all data and activity. If something goes awry, you have no way of knowing when or how it happened, and who was responsible. To protect yourself and everyone else who logs in, it’s critical that all users have their own unique logins. They should only be allowed to access information and functions that relate to their job duties.
You can restrict QuickBooks users to certain screens and activities.
To assign these permission levels, open the Company menu and click on Set Up Users and Passwords, then Set Up Users. This opens the User List window, where you should be identified as the Admin. Click Add User. Enter a user name and password for an employee who needs access (this can be changed later). Check the box in front of Add this user to my QuickBooks license.
Tip: Not sure how many users are allowed under your current license? Click F2 and look in the upper left corner. If you need to add licenses, let us know.
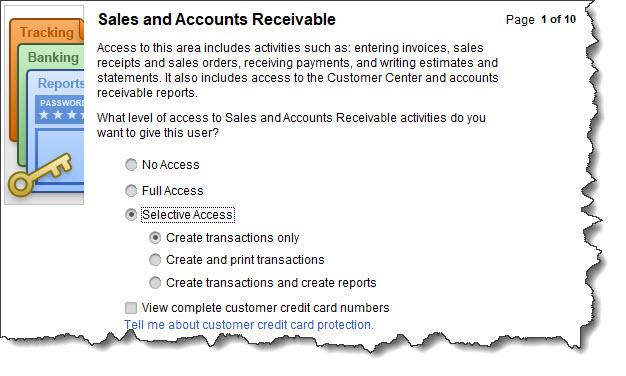
Click Next. The next screen lists three options. You can grant access to all areas or to selected areas. You can also create a login for us as your external accountant, which lets us see everything except sensitive customer data. Select the second option and click Next. You can see in the image above that you can give the employee different levels of responsibility. When you’ve made your choice, click Next. The subsequent nine screens deal with different areas of QuickBooks and their related activities.
Tip: When you need to change your password, which you should do at a minimum every three months, go to Company | Set Up Users and Passwords | Change Your Password.
Save your company file elsewhere.
You should always be backing up your company file to an external storage device (like a CD or thumb drive). To set this up, open the File menu and select Back Up Company, then Create Local Backup. This window will open:

The Create Backup window
Make sure Local backup is selected, then click the Options button below (not pictured here). Click Browse to see a directory of your PC and select the correct destination. Leave the two boxes below it checked; this will add the backup date/time to the filename and limit the number of backup copies to three.
By default, QuickBooks will remind you to back up your file every fourth time you close your company file; you can change this number if you prefer. Leave the Complete verification option checked and click OK, then Next. Specify when you want to save your backup copy and click Next again. You can schedule regular backups of your company file on the next screen if you’d like. When you’ve completed this screen, click Finish.
You should also consider saving a copy of your company file to the cloud. Intuit offers its own service for this; it costs $9.95/month or $99.95 annually, but it gives you 100 GB of storage space, so you can back up other critical business files, too. If you can’t swing this financially, at least store your backups to a portable device that you can carry offsite.
Warning: If you already pay for cloud storage from another vendor, don’t assume you can just copy your QuickBooks file to it. Talk to us.
Other Steps
There are other things you can do to protect your QuickBooks data, including:
- Insist on strong passwords. Yes, it’s a pain to create and remember them, but it’s critical here.
- Keep everything updated. That includes your operating system and anything else that requires updates.
- Minimize web browsing on work computers and remind employees about smart email behaviors.
We strongly recommend that you consult with us as you’re setting up any kind of backup system for QuickBooks. The software’s instructions are straightforward, but we don’t want you to do anything that would jeopardize the integrity of your company file.
Social media posts
Just because you’re a small business doesn’t mean you’re not a target for hackers. Keep your QuickBooks company file safe. We can help here.
If you have multiple people using QuickBooks, you must assign user permissions to each to safeguard information. Ask us how this is done.
Where and how often are you backing up your QuickBooks company file? The software contains tools for this. We can help you set them up.
Keeping QuickBooks data safe means keeping everything on your computers and network updated. Are you doing this? If not, we can show you how.

