Wednesday, July 22, 2020

Communicate with Customers: QuickBooks and Microsoft Word

The pandemic has forced businesses to find new ways to connect with customers. QuickBooks has built-in tools that can help.


Businesses are starting to cautiously re-open in the U.S. (at least partially), but we’re still a long way from “normal.” Because of COVID-19, some companies have done very well. Most, though, have had to make changes to comply with health guidelines and keep their customers and employees as safe as possible. And many consumers and businesses are less willing to spend money until they know more about the country’s path to recovery.


If your business has had to shut down temporarily, or at least scale back operations, we hope you’ve found ways to stay in touch with your customers. Even if you’re struggling, it’s important to communicate with the people who have helped you build your company.


QuickBooks can support you in this effort. Its integration with Microsoft Word makes it possible to create and dispatch letters or emails to customers that can fit a variety of common situations. There are dozens of pre-written templates that you can personalize and send to one or 10 or hundreds of the consumers and companies with whom you’ve built a relationship. Here’s how it works.


Finding Your Message


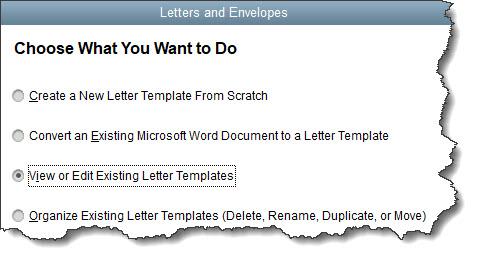
To get started, open the Customers menu and select Customer Center. To explore what’s available, click the down arrow next to Word in the toolbar, then select Customize Letter Templates. This window will open:

A screenshot of a cell phone

Description automatically generated
Before you start preparing customer letters, you should see what’s available.


Click the button in front of View or Edit Existing Letter Templates, then click Next. You’ll see the letter templates that are available, divided into types. Spend some time clicking on each type to see what your options are. 


Let’s say you want to send a letter to customers who haven’t been active for a while. Click the button in front of Customer and scroll down to Inactive customer. Select it and click Next. You’ll notice that Microsoft Word has opened and is displaying your letter template, which is now saved to your QuickBooks folder. If it’s in your taskbar tray, click to open it. Read through it and make any changes you want, then save to the current folder and close it. Click Use Template


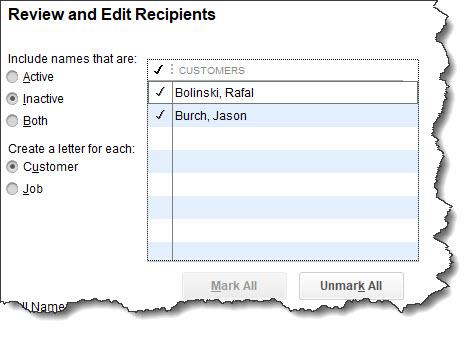
In the window that opens, you’ll select the recipients of your letter. Under Include names that are, you’ll click the button in front of Inactive.  You want to direct your correspondence to customers, not jobs, so click the button in front of Customer. Look at the list that QuickBooks has displayed and make sure all of the entries have a checkmark in front of them. If you want to remove any of them, click the checkmark to turn it off. Click Next.

A picture containing screenshot

Description automatically generated
You can select the customers who are to receive your correspondence on this screen.


Editing Your Letter


In the window that just opened, Inactive customer should be highlighted. Click Next. Enter the Name and Title that should appear in your letter’s signature. When you click Next again, a single Microsoft Word document will open containing all of your letters in one continuous document (each letter will start on a new page). You’ll be able to edit these letters without affecting the original template.


If you want to print envelopes, you’ll click Next. If you want to continue on to edit and send your letters, click Cancel. Your personalized letters should be in your Windows taskbar tray. Open the document and scan through it to see if you want to change anything.

A close up of text on a white background

Description automatically generated


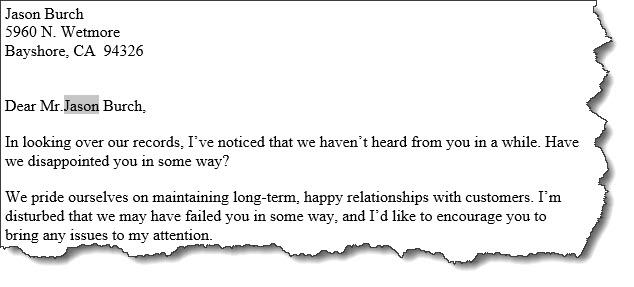
You can edit your customer letters individually.


In the example above, you might want to, for example, delete the customer’s first name so it just reads Dear Mr. Burch. Or, you might want to change the words “Have we disturbed” to something like “worried” in the second paragraph.


If you want to save these letters as edited, you can go ahead and do so. Otherwise, just print them as you would any Word document. Of course, you could copy and paste them into your email system and send them that way. But sending a signed, printed letter during these times provides a more personal touch.


You may have already developed the habit of communicating with your customers outside of exchanging sales forms and payments. If not, consider finding ways to interact occasionally with those individuals and companies that keep your business going. This is especially important right now, as we all wait to see how the recovery will continue to progress. Let us know if we can help in any way during this uncertain period.


SOCIAL MEDIA POSTS


Are you staying in touch with your customers during this uncertain period? Even if they’re not buying, let them know you’re there. Here is how QuickBooks can help.


QuickBooks contains templates for letters you can automatically create in Word and send to customers. Ask us how this works. 


Did you know that you can use pre-written letter templates in QuickBooks to create customer correspondence? Here is how this feature works.

Did you know that QuickBooks’ letter templates cover a wide variety of topics? You can personalize them and send them to one or 10 or 100 customers, and as businesses slowly re-open now is the perfect time to utilize this feature.

Wednesday, July 8, 2020

3 Ways to Receive Payments in QuickBooks Online

Recording customer payments is one of your more pleasant accounting tasks. Depending on the situation, you can choose from multiple ways to do this using QuickBooks Online.


If you made New Year’s resolutions this last January, you’ve probably had to revise them. No one knew what was coming when 2019 turned over to 2020. We hope that despite the turmoil and disruption of the last six months, you’ve managed to stay healthy and keep your small business running.


It’s more important than ever to conscientiously record all of the money coming into your company and ensure that it gets deposited into your account(s). QuickBooks Online offers several ways to accomplish this. Whether you’re receiving payment on an invoice, documenting an instant sale, or selling on the road - the site provides tools to make certain that your receipt of the funds is entered in the correct place.


Delayed Payments


Do you send invoices for products and/or services? If so, there’s more than one way to record payments when they come in. You can, of course, just open the invoice and click Receive payment in the upper right corner. We find, though, that going to the All Sales screen gives us a chance to check the status of other pending transactions. Click Sales in the toolbar, then All Sales.


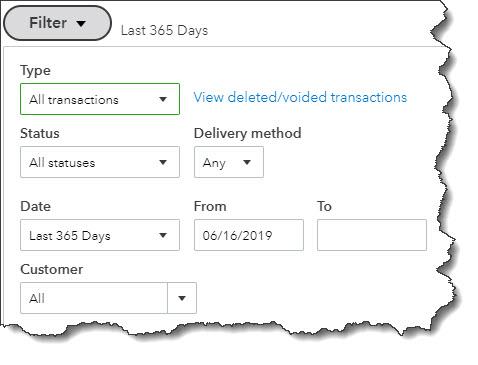
If your list isn’t very long, you can just look for the invoice number. If not, you can use the Filter tool to find the original form. Click the down arrow next to Filter in the upper left to see your search options here (Status, Customer, etc.). 


A screenshot of a cell phone

Description automatically generated
If you have a lengthy list of sales transactions, you can search for the one(s) you want in this drop-down window.


Once you’ve found the invoice, look down toward the end of that row. In the Action column, you’ll see Receive payment. (While you’re there, click the down arrow to familiarize yourself with the other options.) When the Receive Payment window opens, select the Payment method that applies. Leave the Deposit to field showing Undeposited Funds and look over the rest of the screen to make sure everything is accurate. Print it if you’d like and/or add an Attachment using the links at the bottom, then Save it. 


Tip: Customers tend to pay invoices faster if you allow them to make payments online. If you’re not yet set up for this, we can help you.


Instant Payments


Your business may collect payments at the time you provide a product or service. When this happens, you’ll want to supply your customers with a sales receipt instead of an invoice (this is also important for your own records). Click the +New button in the upper left and select Sales receipt under Customers to open a blank form. You’ll fill this out just like you would an invoice, by selecting the Customer first, then entering or selecting any data needed for the other fields.


If you don’t anticipate needing all of the fields on your sales forms, you can remove some of them and even add your own. Ask us how this works.


A close up of a piece of paper

Description automatically generated
If you’d like to add custom fields to your sales forms, you can do so in QuickBooks Online.


When you’ve completed all of the fields in your sales receipt, you can preview and print it. You can also save and email it to the customer.


Going Mobile


If you generate sales on the road, you can still create sales receipts for customers using the QuickBooks mobile app. Just click the plus (+) sign at the bottom of the screen and select Sales Receipt. The form is similar to the one you’d use on your desktop computer, though the layout is different, of course. 


Having a QuickBooks Payments account is especially helpful when you’re making mobile sales. You can even swipe your customers’ credit and debit cards if you order a card reader from Intuit. We can walk you through this process.


You don’t ever want to record a payment incorrectly, of course, but it’s especially important right now to ensure that you’re accounting for every dollar that comes in. Please stay healthy and safe, and let us know if we can help in any way with your accounting and your use of QuickBooks Online.


SOCIAL MEDIA POSTS


Do you know which QuickBooks Online form to use when a customer gives you money? We can walk you through the options that are especially important right now.


Can your business accept credit and debit cards online? This can help you get paid faster, especially during times like this. Let us tell you about QuickBooks Payments.


When you receive payment immediately for a product or service, it’s important that you create a Sales Receipt in QuickBooks Online. Here is how to get started.

You might be surprised by how much you can accomplish remotely using the QuickBooks mobile app. We can introduce you and show you how.

Wednesday, June 24, 2020

Make QuickBooks Yours: Customize the Desktop

Make QuickBooks work faster for you by changing a few settings.


Whether your business has been locked down because of the pandemic, or you’re scrambling to hold things together with fewer employees or diminishing sales, you’re probably leaning on QuickBooks more than ever. You may be watching dwindling inventory items closely or monitoring your daily cash flow or trying to collect on invoices that aren’t being paid because your customers are short on money.


QuickBooks can help with all these accounting tasks. But you certainly don’t want to waste time now just dealing with the software’s mechanics. 


As always, we’re available to help as you deal with the toll that COVID-19 is taking on your company. We’d also like to suggest that you spend a little time customizing QuickBooks. Streamlining its operations will take some of the unnecessary frustration out of your work life.


Getting Around Quickly


QuickBooks tries to accommodate different work styles and preferences by providing multiple navigation methods. These are:
  • The old, standard Windows menus. 
  • The home page’s icons. 
  • The Icon Bar that appears in the left vertical pane by default (you change its position by opening the View menu).


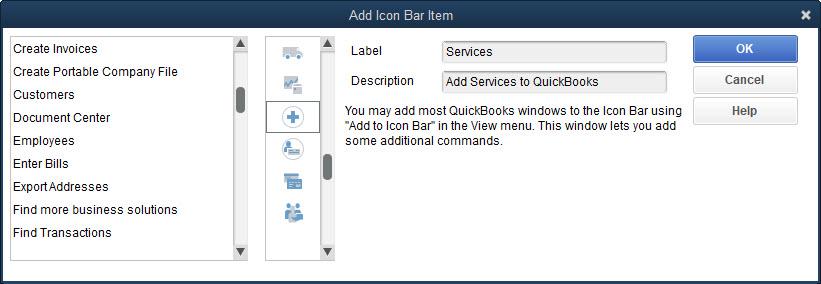
If you’re going to use the Icon Bar, we recommend that you set it up to make your most often-used tools prominent. Right-click in the toolbar and click on Customize Shortcuts to open the Customize Icon Bar window. In the upper left corner, you’ll see a list of your icons as they’re currently arranged. You can rearrange them by grabbing the small diamonds to their left with your mouse and dragging them to their new positions. You can change their labels by clicking Edit, or Delete them.


A screenshot of a cell phone

Description automatically generated
You can add almost any window in QuickBooks to your fast-access Icon Bar.


You’re not limited to the items in the list. Click Add, and the Add Icon Bar Item opens, as pictured above. Click on any of the ones you want to include in the Icon Bar, then click OK.  QuickBooks allows you to add almost any screen to your Icon Bar. Navigate to the window you want to add, then open the View menu and select Add…to Icon Bar. If you never use the Icon Bar, you can collapse it by clicking the small arrow to the right of the Search box at the top of the pane. You can also close the home page by clicking the lower of the two small X’s in the upper right.


Tile Your Windows
If you regularly work with the same handful of screens, there’s a faster way to access them. Open them all, then open the Window menu and select Tile Vertically. All the windows will be displayed on the same screen, arranged vertically. If there are enough of them, they will overlap. To activate one, just click on it. You can open it to full screen by clicking the small rectangle in the upper right and return to your vertical arrangement by clicking the double rectangle in the upper right.


If you’d prefer, you can Tile Horizontally. Or, you can click Cascade to display them stacked on top of each other with only each window’s title label showing, as shown below. If you want to go back to a blank screen and start over, click Window | Close All. The Window menu also displays a list of open windows that can be used for navigation.


A picture containing screenshot

Description automatically generated
If you click Window | Cascade with multiple windows open, QuickBooks will stack them, with only the bottom screen showing. Click on a title label to open a different window.


The Desktop View


There are other ways you can make QuickBooks work the way you want it to. Open the Edit menu and select Preferences, then Desktop View. Click on the My Preferences tab if it’s not already highlighted. There are several preferences here. Look under the Desktop heading. You can have QuickBooks open to the configuration of windows you want. Your options are:


  • Save [the windows that are already open] when closing company.
  • Save current desktop (a specific set of windows).
  • Don’t save the desktop (always open to just the home page).


Click the Company Preferences tab to add or remove icons from the home page. This is also where you turn features on and off.


We’re Still Here


All these suggestions may seem minor to you. But they will save time. More important, they will give you a better sense of control over the hours you spend on accounting tasks. And with so many things out of our control right now, creating a software environment that is tailored to your workflow can benefit you.


We know that you may be struggling right now to maintain your financial health, as well as your physical health. More than ever, we hope you’ll contact us if you have a QuickBooks or general accounting problem that we could solve. We’ll be happy to do what we can to help you through during this very challenging period. 


SOCIAL MEDIA POSTS


Did you know that you can tailor your QuickBooks desktop view to accommodate your personal workflow? During times like these with so many things out of our control, creating a software environment that is tailored to your workflow can benefit you. Find out how here.


It’s easier to get around in QuickBooks if you customize its navigation tools. We can help you set up a desktop that saves time and reduces confusion, which is especially helpful in today’s times.


Did you know if you consistently use the same set of windows in QuickBooks, you can save that combination and view it in multiple ways, saving you time and giving you more control? Here is how.

It’s more important than ever to keep your accounting records organized and updated. Here are a few ways QuickBooks can help by accommodating your personal workflow. And remember, we’re still here to help during this challenging period.

Wednesday, June 10, 2020

Tracking Mileage in QuickBooks Online

If you’re having to drive for work during the pandemic, let QuickBooks Online make sure you’re recording all of your deductible mileage.


Many states are starting to open for business again. If yours is one of them and this is affecting you, we hope you’re taking steps to stay healthy. We also hope that you’ve been keeping up with your changing finances by using QuickBooks Online. 


As many will resume back to the day to day of business, if any part of your work involves driving business miles that can be deducted on your income taxes, you’ll want to know about a relatively new QuickBooks Online feature: mileage tracking. You can NOW record trips either manually or automatically, and the site will calculate your deductions. Here’s how it works.


Tracking Trips Manually


Before you get started, you’ll want to create a record for the vehicle you’ll be using. Click Mileage in the navigation toolbar. Hover over the green Add trip button in the middle right of the screen, then click View Vehicles. Then click Add vehicle and complete the fields on the screen that opens. Click Save. Back on the main screen, click directly on Add trip. The New trip panel will slide out from the right.


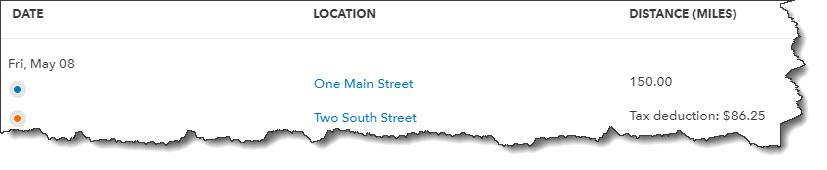
Enter the Date, then the number of miles driven (Distance). If you’d like, you can enter the Starting point and Ending point for your records. Click either the Business or Personal icon and enter a Description. Select the correct Vehicle if you use more than one and click Save. Your trip will now appear on the main screen with your tax deduction already calculated, as pictured below. Click the More button at the end of the row (not shown here), and you’ll be able to Edit your trips and Duplicate them.


A picture containing screenshot

Description automatically generated


Once you’ve created a record for a trip in QuickBooks Online, it will be added to the list on the main Mileage screen.


Auto-Track Your Miles


There’s another way to track your trips, one that doesn’t involve writing down your odometer readings or mileage. The QuickBooks Online mobile app will automatically track your miles as you drive.


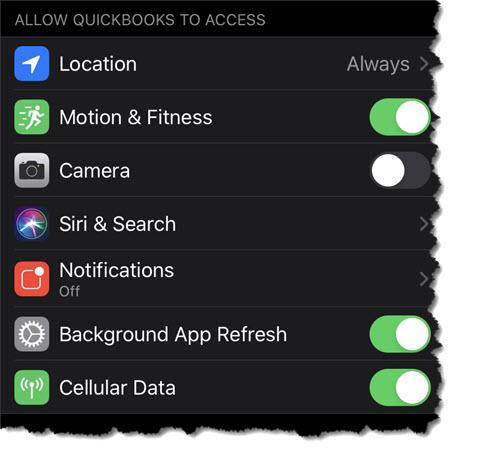
To set this up, open the app and click on the three horizontal lines in the lower right to open the app’s navigation shortcuts. Then click the Mileage icon.  Auto-tracking is off by default, so you’ll have to click OFF to open the Mileage settings screen. Click the Auto-tracking button to change it from grayed-out to green. In the small window that opens, click Settings to go to the QuickBooks section of your phone’s Settings screen and make these changes:


  • Location must be Always On.
  • Motion & Fitness must be On.
  • Background App Refresh must be On.
  • Cellular Data must be On.


A screenshot of a cell phone

Description automatically generated


Before you can automatically track your mileage in QuickBooks Online, you’ll need to change some settings (image above taken in iPhone; Android phones have similar settings).


Close this screen and return to the QuickBooks Online app’s main Mileage screen after you’ve changed your settings. Auto-tracking should be ON. Click the + (plus) sign in the lower right, then Create trip. The app will automatically detect your starting and stopping locations using your phone’s GPS. When you’ve arrived at your destination, open the Mileage app again. 


Swipe left on the trip’s record to categorize it as business and right to mark it personal.  Enter the trip’s purpose if it’s a business trip and click Save. You’ll now need to turn off Auto-tracking and reverse the changes you made in your phone’s Settings (unless, of course, you normally leave any of them on).


A Quick Tip


Do you ever find yourself opening QuickBooks Online in a new tab because you need to check something in another part of the site but don’t want to shut down your current screen?  If you’re accessing QuickBooks Online through Google Chrome, it’s easy. Right-click anywhere in the navigation toolbar that contains links (not the blank space below) and select Open link in new tab. A new tab will open to a QuickBooks Online page. You can do whatever you need to do in the second tab without disturbing your original page.


Stay in Touch


The COVID-19 pandemic has had impact on both large and small businesses all around the world. We hope you’ve stayed physically and financially healthy during this exceptionally difficult time. Don’t hesitate to contact us if we can help with your use of QuickBooks Online and/or your overall accounting.


SOCIAL MEDIA POSTS


As many will resume back to the day to day of business, did you know QuickBooks Online can now help you track your business mileage? It automatically calculates your tax deduction. Find out how here.


Did you know the QuickBooks Online mobile app has a NEW feature? It can automatically track your mileage as you drive. You’ll of course have to change some phone settings first, and we can show you how.


As states and businesses open back up, if you put a lot of tax-deductible miles on your vehicle for work, you’ll want to check out QuickBooks Online’s new Mileage feature. Find out about it and how to set it up here.


Did you know QuickBooks Online allows you to track your vehicle mileage either manually or automatically? This is helpful if you put a lot of tax-deductible miles on your vehicle for work. Ask us about this new feature.