Wednesday, January 20, 2021

Should You Charge Late Fees? QuickBooks Can Help

 Do you have a lot of aging receivables? Assessing finance charges can speed up customer payments.


Have your customers been submitting payments later than usual these last several months? It wouldn’t be surprising. Many businesses are struggling to pay bills these days. Still, you need to get paid – and on time. Tardy receivables have a negative impact on your own cash flow.


We’ve discussed ways to encourage prompt payment in past columns. For example, you can start accepting credit/debit cards and direct bank transfers, make sure invoices go out immediately after a sale, or offer a premium like a small one-time discount for paying on time 12 months in a row to name a few.


You can also assess finance charges on remittances that come in after the due date. QuickBooks provides the tools to allow this.


Setting It Up


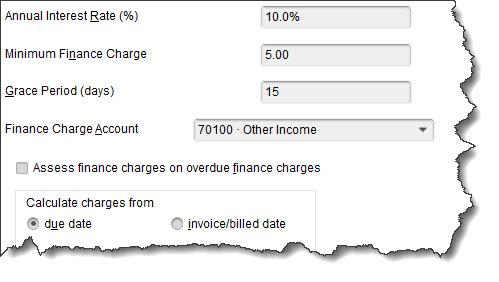
Before you start charging extra for late payments, you’ll need to do some setup work in QuickBooks. Open the Edit menu and select Preferences, then Finance Charge. Click the Company Preferences tab. You’ll see a window like this:


Graphical user interface, text, application

Description automatically generated

You can set your own preferences for assessing finance charges in QuickBooks.


You’ll have to answer these questions and enter your responses in the window:


What will your Annual Interest Rate (%) be?


What will you set as a Minimum Finance Charge?


Will you allow a Grace Period? This is the number of days given to your customers to make their payments after the due date before finance charges kick in. This is typically from 15-21 days.


Where should captured finance charges go? In this example, the Finance Charge Account has been assigned to Other Income. 


Do you want to Assess finance charges on overdue finance charges? Some jurisdictions don’t allow you to charge interest on overdue interest charges. If you want to do this, check on your local lending laws - specifically state usury laws which may limit the amounts that can be charged.


When will you start to Calculate charges? In this example, the due date is selected. So, QuickBooks will start to add finance charges 21 days after the stated due date. If you choose invoice/billed date, you’ll want to make your grace period longer. This can be rather a confusing concept. Contact us if you want a deeper explanation.


Assessing Finance Charges


There’s one more issue on the Preferences screen that you’ll need to resolve. QuickBooks offers two ways to notify customers about finance charges. You can’t include them on invoices, like you may be used to seeing on credit card bills. Rather, you have to print separate invoices that only contain the finance charges. 

If you put a check in the box in front of Mark finance charge invoices “To be printed,” you can print them out separately. If you leave the box blank, the finance charges will appear on the customer’s next statement. Click OK when you’re done with this window.


Graphical user interface, table

Description automatically generated

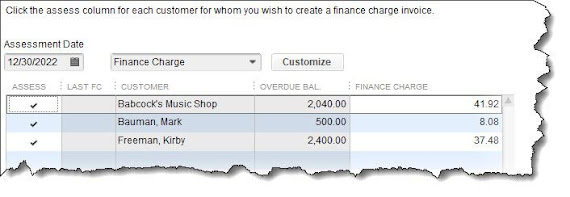
QuickBooks can find the overdue invoices that need to have finance charges applied and display them in a window like this one.


Open the Customers menu and select Assess Finance Charges. A window like the one in the image above will open. Make sure that the Assessment Date is the actual date you want to assess charges, which may not be the current date. Click in the Assess column to create a checkmark for every customer you want to charge. When you’re done, click Assess Charges.


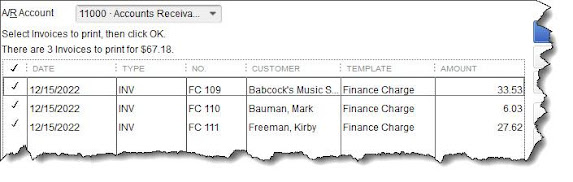
When you’re ready to print finance charge invoices, open the File menu and select Print Forms | Invoices to open a window like this:


Graphical user interface, table

Description automatically generated

Invoices with an FC preceding the number are finance charge invoices ready for printing.


Lots to Learn


Besides knowing whether you can charge finance charges on existing finance charges, there are other considerations. For example, do your state’s lending laws allow you to use the phrase “finance charge” or must you use something like “late fee?” When should you assess finance charges? Have you notified your customers of your intent to begin assessing finance charges? This is definitely something they should know in advance. You might need to add this to your customer message on invoices.


We can’t tell you whether finances charges are the path you should take to improve your cash flow as there are many issues to consider. But we can help you with the mechanics of doing so and are here to answer any questions. Let us know if you want to get started using this tool, we can help.

Wednesday, January 6, 2021

How to Create Recurring Transactions in QuickBooks Online

 QuickBooks Online saves time and improves accounting accuracy in numerous ways. One example is its support for recurring transactions.


It’s easy to get distracted when you’re doing dull, repetitive accounting work. That distraction leads to errors sometimes. So, besides the time you’re spending on work that could be automated, you have to tack on additional time to chase down your mistakes.


QuickBooks Online already reduces repetitive data entry by saving your lists of customers, vendors, products, etc., and making them accessible when you’re creating transactions. But it does more to save time and minimize errors by allowing you to create recurring transactions. Enter a transaction like an invoice or bill once, and QuickBooks Online memorizes it for future use!


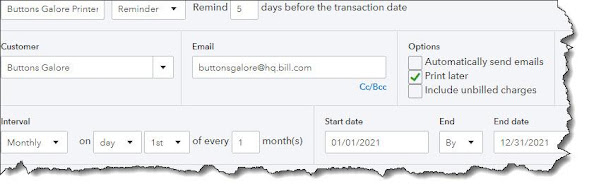
Here’s how it works. Let’s say you have a customer who wants to rent a printer from you for one year. You create an invoice for one month’s rental. At the bottom of the screen, click Make recurring. A partial view of the screen that opens is pictured below.


Graphical user interface, application

Description automatically generated

QuickBooks Online allows you to set up a transaction to repeat at scheduled intervals.


Much of this screen will have already been filled in. You’ll need to enter a name for the template you’re creating at the top of the screen, one that will remind you of its content. In the second field, the drop-down list displays three options for how the recurring transaction will be handled by QuickBooks Online They are:


  • Scheduled. Your invoice will go out automatically at the scheduled interval, with only a change to the date. As with any automated process, you should be very careful when selecting this option.

  • Reminder. You will get a reminder ahead of each occurrence so you can make any necessary changes before sending.

  • Unscheduled. No automation is involved here. The invoice is memorized, but you’ll have to remember when it needs to go out.


If you chose Reminder, the next field will read Create (x) days in advance. Enter the number of days here. On the next line, you’ll only have to check or uncheck the Options. 


Under Interval, you’ll tell QuickBooks Online when the invoice is scheduled to go out. You can choose from Daily, Weekly, Monthly, and Yearly. The invoice in this example should be processed and sent on the first day of every month. The start date is January 1, 2021, and it will end on December 31, 2021. If your recurring transaction should continue to go on indefinitely, you’ll have the option to select None from the drop-down list under End. You can also choose After.


Check the fields below this line to make sure they’re correct. You can change the message if you’d like and add an attachment. If everything looks correct, click Save Template in the lower right corner.


Using Recurring Transactions


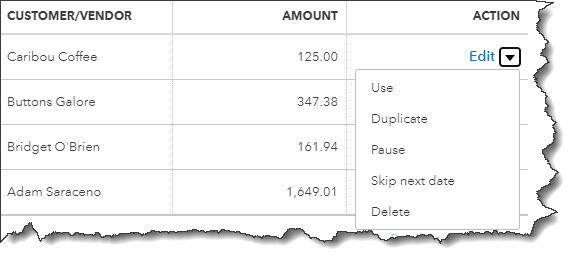
If you’ve set this transaction up to recur automatically, you don’t have to do anything more with it unless you need to edit it at some point. If you need to do so, or if you’re responding to a reminder (or chose not to be reminded), you can access the list of transactions you’ve memorized by clicking the gear icon in the upper right and selecting Recurring Transactions under Lists. A screen containing this section will open:


Table

Description automatically generated

Once you’ve created recurring transactions, you have several options for managing them.


The table that appears will contain other columns describing the recurring transactions, like Type and Interval. The image above shows the end of each row that reads Edit until you open the drop-down menu. You can see what your options are. They include Use, which you would select when you want to edit and/or send a transaction. You can also create a Duplicate, Pause the recurrences temporarily, Skip next date, or Delete the template. Click the arrow next to Reminder List in the upper right and select Run Report to see the Recurring Template List Report.


As you can see, recurring transactions can not only save time, but they can also help reduce errors and minimize unnecessary work. They’re not overly difficult to create, but you should use caution if you choose to automate them. We’re available to answer your questions about this useful tool and about any other element of QuickBooks Online. Stay healthy, and here’s to 2021!


Wednesday, December 23, 2020

New to QuickBooks? Try These 5 Activities

 QuickBooks can be overwhelming when you first start using it. Here are five ways to familiarize yourself with some of its features to get you up and running in no time.


Tackling any new piece of software can be daunting. Add a complex process like accounting to the mix, like QuickBooks does, and you may feel apprehensive about your ability to learn how to use it. 


But QuickBooks was designed for small businesspeople, not for accountants nor technical wizards. It uses familiar language and forms, and it works like other Windows programs. That doesn’t mean, though, that you’ll be able to just jump in and start completing your accounting tasks. 


Here are five steps you can take to start familiarizing yourself with QuickBooks that will get you up and running in no time. We’ll assume that you’ve already created your company file. If you need help with this critical first step, let us know.


Open a sample file.


While you’re exploring QuickBooks, it’s a good idea to work with a sample file. That way, you can look around and practice without risking compromising your company file. You’ll be able to see how completed records and transactions should look and try your hand at entering sample data of your own.


Graphical user interface, application

Description automatically generated

QuickBooks comes with sample files that allow you to practice entering data without harming your own company file.


Before you open a sample file, you’ll need to close your current company. Click on File in the upper left to open that menu, then select Close Company. A window will open that should have your company file in its list. Below that, you’ll see three boxes containing different options. Click on the down arrow next to Open a sample file, as pictured above (this may look slightly different in your version). Choose the one you want to open and click on it. QuickBooks will load again with that file open. When you’re done looking at the sample file, go to File | Close Company again. The No Company Open window should appear again. Click on your company file name and then on Open to return to your own file.


Learn where your lists are.


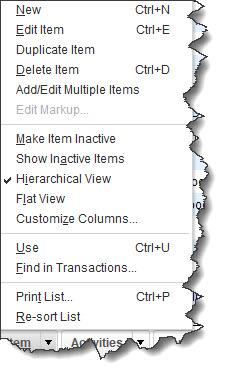
You’ll be storing a great deal of information in lists. QuickBooks maintains these automatically sometimes when you enter information in a record or transaction. For example, when you create a record for a product or service you sell, it goes into a master list that you can access by opening the Lists menu at the top of the screen and clicking on Item List. You’ll also open the Lists menu when you want to add options to an existing type of list, like Class List (QuickBooks allows you to assign Classes to transactions so you can group related information, like New Construction or Remodel if you’re a contractor).


Graphical user interface

Description automatically generated

You’ll sometimes select from lists of commands in QuickBooks. This is the menu for the Item List.


Try a Transaction.


There are two transactions you’ll probably be using the most: invoices and sales receipts. QuickBooks comes with templates that resemble these sales forms’ paper counterparts. You simply fill in the blanks by entering data and selecting options from drop-down lists. Open the Customers menu and select Create Invoices. Click the back arrow above Find in the upper left corner to see sample invoices. Then click the right arrow to get back to a blank form and create an invoice by clicking the down arrows in blank fields to see your sample lists.


Explore Snapshots.


Once you start entering records and transactions, you’ll want to be able to access that information in ways that provide insight on how your company is doing. You’ll eventually start running reports in QuickBooks, but the software also accomplishes this through its Snapshots. There are three of them, and they all provide these overviews by using data tables and charts. Open the Company menu and click on Company Snapshot, then click the tabs to move between Company, Payments, and Customer. You’ll learn how QuickBooks provides real-time information about your finances.


Look at the Income Tracker.


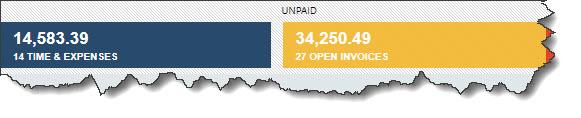
It’s easy to see the status of your invoices (and estimates) in QuickBooks. Open the Customers menu and select Income Tracker. Colored bars at the top of the screen show you what’s outstanding and what’s been paid. A list of the related transactions appears below these bars.


A picture containing knife

Description automatically generated

This partial view of the Income Tracker tells you how much money is tied up in unbilled Time & Expenses and unpaid Invoices.


As we said earlier, QuickBooks can be overwhelming when you first start to use it. We can ease that transition by providing training and helping you move your existing accounting information over to the software. If you’ve started using QuickBooks on your own and you have questions, we can always step in to offer answers.


Stay healthy, and best wishes for a more prosperous 2021.


Wednesday, December 9, 2020

5 Resolutions QuickBooks Online Users Should Make for 2021

 New year, new challenges, and the potential for new successes. Here are five ways you can improve your financial management in 2021.


A painful year is drawing to a close. We’ll still be dealing with COVID-19 and a struggling economy in early 2021, but there’s hope on the horizon. There’s a lot you can’t control about the difficulties facing our country, but you can take control of your corner of it, especially in terms of how you manage your finances.


If you’re already using QuickBooks Online, you know how it’s solved the paperwork confusion of the past. But are you taking advantage of all of its capabilities? As you turn your digital calendar to January, consider expanding your use of the website to set yourself up for success in the new year. Here are five features to explore if you haven’t already.


Practice Proactive Reconciliation:


QuickBooks Online’s Banking screen display registers for the bank and credit card transactions that have been posted by your banks. Do you review these frequently? It’s easy, and it’s important. It will save time when you do your monthly reconciliations with your bank statements. Hover over Transactions in the toolbar and select Banking. You can see some of your transaction management options in the image below.


Graphical user interface, application

Description automatically generated

Once QuickBooks Online has downloaded a transaction from your bank, you have multiple options for dealing with it and clearing it.


When your statement comes and you’re ready to reconcile, you can use QuickBooks Online’s tools that take you step by step through the process. Hover over Accounting in the toolbar and select Reconcile. Let us know if you need help with reconciliation or with managing downloaded transactions.


Start Accepting Online Payments:


This is probably the #1 way to encourage customers to pay you faster. When you set up a merchant account through QuickBooks Payments, you’re be able to accept credit cards, debit cards, and ACH bank transfers. Your invoices will include a Pay Now button and will contain the information your customers need to pay electronically. Their funds will go into your bank account.


There are other ways they can pay you directly. You can take their card numbers over the phone. You can also get a free card reader from Intuit and swipe their cards on your mobile device. And you can set up recurring payments that will occur automatically. There are no base fees – you just pay per transaction.


Set Weekly and Monthly Report Schedules:


You may just run reports in QuickBooks Online as you need them. Some reports, though, should be created every week at a minimum, like Accounts receivable aging (detail or summary), Accounts Payable Aging, Open invoices, and Unpaid Bills. There are many others, but you need to keep a close watch on what you owe and who owes you. 


A picture containing text

Description automatically generated

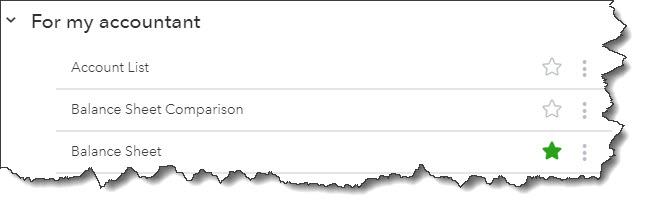
We can help you create and analyze the standard financial reports that should be produced regularly.


It’s important to run some other reports on a monthly (or, sometimes, quarterly) basis, including Balance Sheet, Profit and Loss, and Statement of Cash Flows. Rather than just providing snapshots of where you stand with money coming in and going out, they give you a more comprehensive view of your finances that can help you make better business decisions. They’re complex and often difficult to analyze, though, which is why QuickBooks Online categorizes them as For my accountant. We can create and interpret these for you.


Expand QuickBooks Online’s Features by Using Apps:


QuickBooks Online is generic enough that it can be used by a wide variety of small businesses. But that flexibility may mean that it’s not quite robust enough in one area or another, like inventory management or time tracking. There are hundreds of apps that you can integrate with QuickBooks Online to fill in the gaps. Some are free. Click on Apps in the toolbar. Again, we’re available to help if you need assistance.


Evaluate the Cost-effectiveness of Your Vendors:


It’s easy to stick with the same old suppliers because it’s a hassle to change. But so many companies are hurting because of the pandemic that you may find you can get what you need for less. To go over your whole list, hover over Expenses in the toolbar and click on Vendors. You might clean up your list while you’re at it. Click the down arrow at the end of each row and select Make inactive if you haven’t ordered from specific suppliers over the last year.


As we said earlier, we’re available to meet with you and explain any of the concepts discussed here in more depth. It’s still a hard time for so many small businesses, and we want to be of help wherever we can.


Wednesday, November 18, 2020

How Do You Create Price Levels in QuickBooks?

 QuickBooks allows you to create Price Levels that you can assign to customers and jobs and to individual items.


You already know that when you create a product or service record in QuickBooks, you must assign a sale price to it. But did you know that QuickBooks gives you a great deal of flexibility when to comes to pricing items you sell? The software allows you to create one or more additional Price Levels that you can access in invoices, estimates, sales receipts, credit memos, and sales orders.


There are three ways you can use these. Once you’ve created them, they’ll be available in a drop-down list in the Rate field. This means you can assign them manually to individual transactions. The second option is to assign them globally to specific customers or jobs. Once you’ve done so, that price will apply every time you create a transaction for one of them. Finally, you can create price levels for selected items.


Here’s how it works. Let’s say you want to be able to create a price level that’s 15 percent below the actual price that you can use in individual transactions. You open the Lists menu and select Price Level List. Click the arrow in the lower left corner next to Price Level and select New. A window like this will open:


Graphical user interface, text, application

Description automatically generated

You can create price levels in QuickBooks and assign them to individual sales transactions.


Fill in the field next to Price Level Name, and then click the arrow next to Price Level Type. Select Fixed %. Select decrease from the drop-down list on the next line and enter your percentage number. Round up to the nearest is an optional field, Click OK when you’re done. The next time you create a sales transaction, your new price level will be available as an option when you open the drop-down list in the Rate column.


When you need to edit or delete a price level, go to Lists | Price Level List again and click the arrow next to Price Level in the lower left corner. You have several options here. You can, for example, make a price level inactive so it doesn’t appear on the list. The field next to Price Level is labeled Reports. Click on the arrow to see what’s available there.


Customers and Jobs


You can also apply a price level you’ve created to a specific customer or job, perhaps to reward a customer for frequent purchases. When you do so, that rate will appear every time you enter a sales transaction for the customer or job you selected.


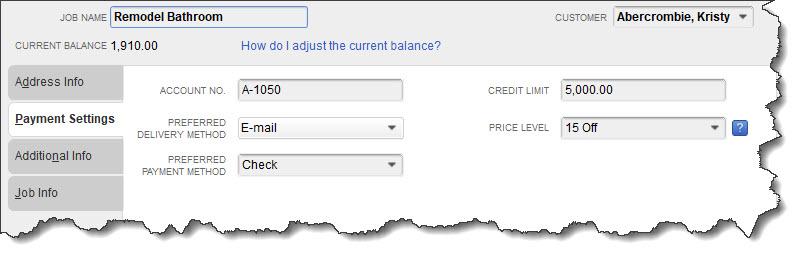
Open the Customers menu and select Customer Center. Double click on a customer or job’s name to open the record. Click on the Payment Settings tab. Click the arrow in the field next to Price Level and select the right one, then click OK.


Graphical user interface, application

Description automatically generated

You can assign a Price Level to specific customers or jobs.


Per Item Price Levels


QuickBooks also allows you to set custom prices for specific items that are associated with preferred customers or jobs (this option is only available if you’re using QuickBooks Premier or Enterprise). Let’s say you want to give a 10 percent discount to specific customers who purchase your website development services. Go to Lists | Price Level List and click the arrow next to Price Level in the lower left corner again, then select New (you can also get to the New command by right-clicking anywhere in the window). 


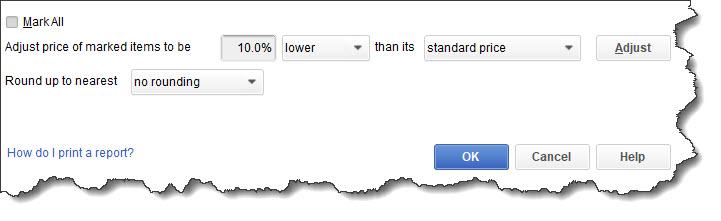
Give your price level a name (like Web Development 10 Off), then select Per Item from the Price Level Type drop-down list. Click in front of the Item you want to include. The fields in the next line should read as pictured in the image below: 10% | lower | standard price. Click Adjust. You’ll see your reduced prices in the Custom Price column in the table above.


Graphical user interface, application

Description automatically generated

You can establish a Price Level for specific items in QuickBooks.


Again, the rounding field is optional. When you’re finished here, click OK. The next time you create a sales transaction for a customer who is eligible for the lower price, you’ll select Web Development 10 Off from the drop-down list in the Rate column.


Feel like you’re outgrowing your current version of QuickBooks, or is it several years old? Talk to us about upgrading. We’re here to support you and to help you more effectively use the software as your business changes and grows.


Wednesday, November 4, 2020

QuickBooks Online's Mobile App: The Basics

QuickBooks Online is more portable than you may realize.


In this work-from-home world, millions of people are finding it impossible to get away from the “office”. But there may be times when you’re not at home or work when it would be really convenient to have access to your accounting data in QuickBooks Online. 


The site’s free companion apps make that possible. Available for both Android and iOS, the QuickBooks Online mobile app can do many of the things that you’re used to doing on your desktop or laptop. And of course, everything you do on the app is synchronized with your browser-based version, and vice versa. Both versions look and work similarly and offer a user experience that makes your mobile tasks easy to accomplish. 


Here’s a look at what you can do.


Graphical user interface, application, Teams

Description automatically generated

The QuickBooks Online mobile app doesn’t look much like the browser-based version, but it can do many of the same tasks.


Navigation Tools


Once you’ve downloaded the QuickBooks Online mobile app and entered your login credentials from the browser-based version, you’ll see a screen full of shortcuts to the app’s main functions. This is an abbreviated list of what you can actually do, but it takes you to the screens you’ll want to see most often. Click the All tab, and a full set of links for the app opens that includes functions missing from the shortcuts page, like Reports and Products & services. 


Click on the home button in the lower left, and the app opens two more screens. One is a Dashboard that’s similar to the one you see in your browser. It displays charts for profit and loss, invoices, and expenses, as well as a list of your account balances. Click the Activity tab to see a list of the most recent activity. Like most everything on the app, the list is interactive. When you click on an activity, the transaction underlying it opens.

There are two more navigation links at the bottom of the screen. When you want to add a transaction, you can click on the + (plus) sign to open your options there. Click the three horizontal lines to open the Shortcuts page. The gear icon in the upper left takes you to the Settings screen, where you’ll find links to Company Information, Tax Rates, Overdue Invoice Alerts, etc.


Records and Transactions


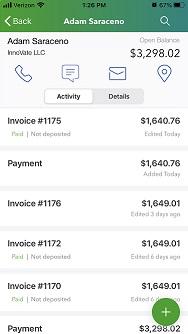
Customer and vendor records are not as detailed as they are on the browser-based site, but they should serve you well for mobile activities. You can toggle between basic contact details and recent activity. There are also icons that allow you to quickly call, text, or email a contact. Product records are not as complete, however you can see each item’s name, description, sale price, tax status, and account and category assignments. You have the ability to edit records and create new ones on the apps.


Graphical user interface, application

Description automatically generated

You can view the data from your browser-based version of QuickBooks Online on the mobile app.


You can also add and edit transactions on the mobile apps, including invoices, estimates, sales receipts, expenses, and invoice payments. These are very thorough. They include the fields you need to bill customers and record purchases. You can even request signatures on estimates, add notes or attachments to invoices, and view a status bar for invoice progress.


Other Features


There are other tasks you can complete on the QuickBooks Online mobile apps. You can snap photos of receipts with your phone. The apps will then upload them to the main site and move some of their data on to the correct fields on forms. You can work with bank deposits, projects, and categories. And you can record mileage for business trips. If you turn on Auto-tracking, the apps will record your mileage as you drive.


There’s one more feature on the app that’s fairly new to QuickBooks Online – so new that it may not have been rolled out to you yet: Cash Flow. This is divided into two sections on the main site, Overview and Planner. The second deals with cash flow projections, which can be a complex concept to understand. We recommend you let us walk you through this tool so you know when it may be wise to take actions that will prevent an impending cash crunch.


Are you experiencing cash flow problems now because of the economic downturn? We can analyze your data and reports in QuickBooks Online and help you come up with a recovery plan, contact us to help you.