Wednesday, April 22, 2020

How to Back Up and Move a Company File in QuickBooks

Your QuickBooks company file is gold. Make sure you know how to back it up and restore it properly.


You may not think of your QuickBooks company file as being portable. It lives safely on the hard drive of your desktop and/or laptop computer. You wouldn’t want it to be anywhere else, right?


However, the most common reason businesses move these critical files is because they’ve purchased a new computer or they may also want to share their data. QuickBooks allows you to create a backup file that you can save to a USB drive or CD, or to another folder on your company’s network. Once it’s available at its destination computer (where a copy of QuickBooks has already been installed), you (or another recipient) will be able to restore it.


Note: These instructions were created using QuickBooks 2018. If you don’t see what’s being described here in your version, contact us.


Making a Backup


You shouldn’t wait until you have to move a QuickBooks company file before backing it up, though. This is something you should be doing regularly. 


Before you start, make sure your copy of QuickBooks is updated, which shouldn’t be a problem if you’re set up with automatic updates. If you’re not, and you’ve ignored those messages about updates that appear when you open QuickBooks, we can help you launch a manual update and configure QuickBooks to automatically update.


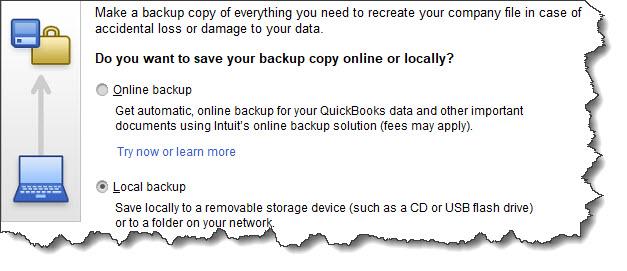
With QuickBooks in Single-User Mode, open the File menu and hover over Back Up Company. Select Create Local Backup. You’ll see this window:

A screenshot of a cell phone

Description automatically generated
You can save your QuickBooks backup copy locally or online.


Intuit offers a service called Intuit Data Protect ($99.95 annually) that allows you to back up your company file online (we can help you explore this if you’re interested). Let’s assume here, though, that you have a USB drive plugged into your computer and are ready for your backup.


Click the button next to Local backup, then the Options button. In the window that opens, you’ll select your destination location and answer a few questions about your backup. One of these gives you the option to get a reminder to back up your file every x times you close QuickBooks, should you choose to do manual backups. 


Click OK to return to the Create Backup window, then click Next. The following screen gives you the option to save your file and/or schedule future (automatic) backups. If you choose to simply save it now, check that button and click Next to verify the destination location and file name.


Note: Before you save your backup file, give it a name that is different from your regular company file. Write down the exact file name and its location.


Click Save. A small window will open displaying your progress, and you’ll get a confirmation message when the file has been saved with a .qbb extension. You can now take the removable storage device to the destination computer, where QuickBooks should already be installed.


Warning: If you want to schedule automatic backups by clicking on one of the two options in the Create Backup window, please consult with us first. Automated processes in QuickBooks can save time and effort, but when you’re dealing with your irreplaceable company file, you must get it right.


Restoring a Backup File


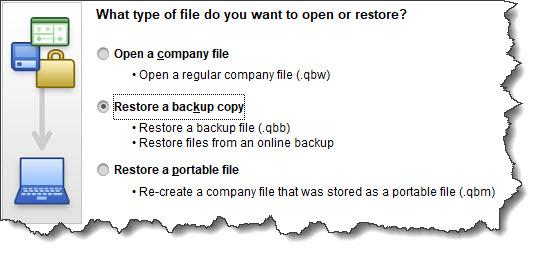
Once that’s done, open the File menu and select Open or Restore Company on the destination computer. This window will appear:

A screenshot of a cell phone

Description automatically generated
QuickBooks displays this window when you select File | Open or Restore Company.


Click the button in front of Restore a backup copy. Click Next and select Local backup. Then click Next again. Click the down arrow next to the Look in field and click on the location of your backup file to display its contents. Browse until you find the file (it should end in .qbb), then highlight it by clicking on it. Click Open.


QuickBooks displays a window that asks where you want to restore your file. You’ll click Next to find it in the Save Company File as window. The Save in field should point to your main QuickBooks directory (like QuickBooks 2018) and the File name field should show the correct file name. 


When everything looks correct, click Save. QuickBooks will convert your .qbb file to the standard QuickBooks file type, .qbw, and open it.


Care Needed


Losing your QuickBooks data, as you know, would be absolutely disastrous. But there may be occasions when you’ll need to open a backup copy of your company file on a different computer. We would be happy to walk you through this the first time you do it; in fact, we highly recommend it. As always, we’re available to work with you on any QuickBooks issues you’re experiencing – or to get you up and running for the first time.


SOCIAL MEDIA POSTS


Buying a new computer? QuickBooks can help you backup your company file and restore it on your new computer. Ask us how this works.


Do you have a backup copy of your QuickBooks company file? If not, it’s important to. Let us help you create one, either online or locally, by following these steps.


Interested in storing your QuickBooks company data to the cloud? Find out about your options here. We’re here to help.

Backing up and restoring QuickBooks data files is a complex set of processes. Here are a few things to consider before you get started. We’re happy to walk you through it.

Wednesday, April 8, 2020

How to Use Rules in QuickBooks Online Transactions

Maintaining your transaction registers conscientiously leads to a clearer understanding of your finances.


Last month, we talked about the types of best practices that can lead to more effective use of QuickBooks Online and, ultimately, more thorough knowledge of your finances. The first one was this: Go through your new transactions every day. Categorizing and otherwise expanding on the data brought in by your financial institutions really pays off when it comes to customer billing, reports, and taxes.


Granted, this habit will add time to your daily accounting chores. But there’s a tool on the site that can greatly accelerate this process: Rules. This feature must be used with care to avoid mischaracterizing or, worse, losing track of critical transactions. Here’s how it works.


Creating Rules


There are two ways to create Rules. The easiest is to start with an existing transaction. Hover over Banking in the left vertical pane and select Banking to open your transaction list. Be sure that you’re looking at transactions that are still For review, as these are the only ones that can be assigned to Rules.


Click on a transaction to open its expanded view. At the bottom of the small window that just opened, click on Create rule from this transaction. A screen like this will open:


A screenshot of a cell phone

Description automatically generated
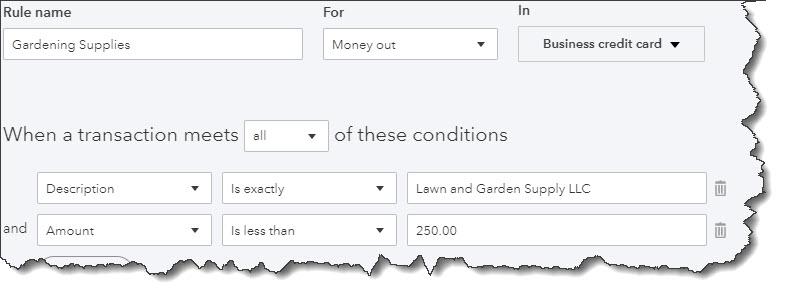
QuickBooks Online’s Rules feature allows you to automatically document transactions that meet certain conditions.


Let’s say you own a lawn and garden maintenance company. You always order supplies from the same vendor, so there are numerous transactions every month. You want QuickBooks Online to automatically categorize and clear transactions under $250; above that, and you’d want to see them individually. 


You’d start by naming the rule, designating it as Money out or Money in, and choosing an account (or leaving this option set at All bank accounts). Next, tell QuickBooks Online whether the conditions you’re about to establish should apply to all or any. That is, if you’re setting multiple conditions, is it all right if just one meets the criteria, or must they all?


Below that, you’d specify the actual conditions that must be present for QuickBooks Online to handle similar transactions in the same way. In our example pictured above:


  • The transaction [Description] [is exactly] Lawn and Garden Supply LLC, and, 
  • The [Amount] [is less than] $250.


So, any transaction that comes into QuickBooks Online from your bank that has Lawn and Garden Supply LLC in the Description field and which is for less than $250 will be treated similarly.  There are other options for the first two fields; you’ll find them by clicking the down arrow.


Now you have to tell QuickBooks Online what to do with the transactions that meet those criteria. Farther down on this screen, you’ll see these options:


A picture containing screenshot, knife

Description automatically generated
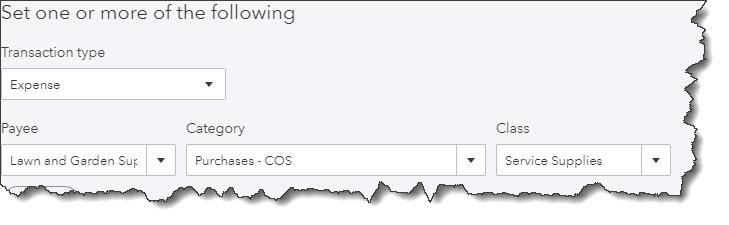
QuickBooks Online will handle the transactions that meet the conditions you set by completing these fields.


Using the drop-down lists of options, you’ll select the Transaction Type, Payee, Category, and Class (if you use them). Every time a transaction comes in that meets the conditions you defined above, QuickBooks Online will apply these options.


Finally, you’ll have to choose from two different ways of processing these matching transactions. You can have QuickBooks Online Auto-categorize and auto-add, in which case the transactions will be automatically processed and moved out of the For review queue. In our example, we chose this so we didn’t have to work with transactions of less than $250; we only wanted to see more expensive purchases. If we had wanted QuickBooks Online to fill in those fields but still show us the transactions, we would have clicked in front of Auto-categorize and manually review. Clicking Save would move this Rule into a list that could be accessed by clicking Banking | Rules, where you can Edit or Delete them.


Complicated Stuff


To recap, because of the Rule that was created here, any transaction in which the Description reads Lawn and Garden Supply LLC and which is for less than $250 will now be auto-completed and moved out of For Review. Any transaction for over that amount will remain in the queue for approval.


QuickBooks Online’s Rules can save time if you have a large volume of similar transactions. But if they’re not created with absolute accuracy, you risk mischaracterizing or missing transactions you should have reviewed before adding them to the Reviewed queue. We’d be happy to help here to ensure that that doesn’t happen, so that you can take full advantage of the helpful Rules feature.


SOCIAL MEDIA POSTS


To save time when reviewing QuickBooks Online banking transactions, you can apply automated Rules. Here’s how to get started. We can help you with this.


Did you know that QuickBooks Online’s Rules feature allows you to automatically categorize banking transactions that meet certain conditions to help you save time? Find out more here.


If your business processes a high volume of banking transactions, you might consider applying Rules to process them quickly. Ask us about this, we can help get you started.

If you’re planning to use QuickBooks Online’s Rules, please consult with us first. This feature once implemented can help you save time, but the set-up process can be complicated. We can help.

Wednesday, March 18, 2020

Sales Receipts, Invoices, and Statements in QuickBooks

QuickBooks allows you to create multiple types of sales forms for different situations. Here’s a look at what they are and when to use them.


When you buy something at a store, you want a piece of paper that shows what you purchased and what you paid. If you receive products or services before you pay for them, you certainly expect to receive a bill. And if you have several transactions with the same company and want clarification on what you’ve paid, and what you owe for a specific time period, the company can usually send you a summary.


Your customers want the same things. That financial documentation might be difficult for you to provide if you’re still doing your accounting manually on paper.


Fortunately, QuickBooks has a solution. Or, rather, several solutions. The software includes templates for all of the sales forms that you’ll probably ever need: invoices, sales receipts, and statements. Here’s an introduction to when and how to use them.


Sales Receipts


A screenshot of a cell phone

Description automatically generated
When a customer pays you on the spot, you can create a sales receipt.


When you receive full payment for a product or service at the time of the sale, the correct form to use in QuickBooks is the Sales Receipt. Click the Create Sales Receipts icon on the home page or open the Customers menu and select Enter Sales Receipts. You’ll see a form like the partial one pictured above.


Click the down arrow in the Customer:Job field and select the correct one or <Add New>. If you assign transactions to Classes, pick the right one in that list. The Template field should default to the appropriate form. If you’ve created more than one sales receipt template, select the one that you want. Click the icon above the correct payment type.


Tip: Want to be able to accept credit cards and eChecks? You’re likely to get paid faster by some customers. You’ll also be able to accept payments on your smartphone or tablet and create receipts. Talk to us about adding this capability.


Select the appropriate Item(s) from that drop-down list and enter a Qty (Quantity). Be sure to apply the sale’s Tax status by opening that list. (If you know that you’re responsible for paying sales tax on at least some of your sales but you haven’t set this tracking up in QuickBooks yet, we can work with you on that. It’s important.) When you’ve finished filling in the table with all the goods or services you sold, you can save the transaction and either print it or email it to your customer.


Invoices


A screenshot of a cell phone

Description automatically generated
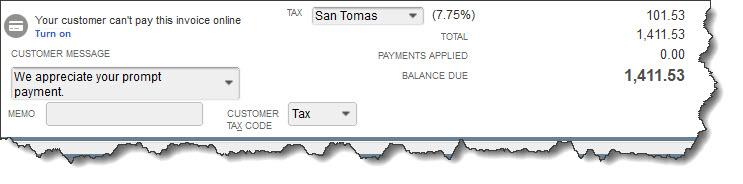
After you’ve completed the top half of an invoice, you’ll see something like this at the bottom.


You’ll create and send Invoices to customers when you’ve received either a partial payment or no payment at the time of the sale. Those completed transactions become a part of your total Accounts Receivable (money owed to you). Click Create Invoices on the home page or go to Customers | Create Invoices. Fill out the fields at the top of the screen like you did with your sales receipt; the forms are almost the same. Invoices, though, have Bill To and Ship To addresses, as well as fields for the sale’s Terms and Due Date.


You shouldn’t have to do anything with the bottom half of the screen (pictured above) unless you want to include a Customer Message, since the information here is carried over from the top of the screen. Check to make sure the Tax Code is correct, though.


It’s important to note, it's an either/or situation when it comes to creating an invoice and a sales receipt for the same transaction. It’s best to not use sales receipts for invoice payments, as it can cause issues.


Statements


A screenshot of a cell phone

Description automatically generated
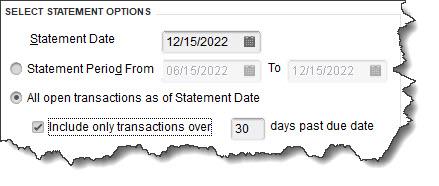
When you create statements, you’ll first choose the customers who should receive them.


Statements are very useful when you have multiple customers who are past due on their payments (you can find this out by running the A/R Aging Summary report, which you’ll find under Reports | Customers & Receivables). Click the Statements link on the home page or go to Customers | Create Statements.  You’ll first have to select the customer(s) who should be on your list, as pictured above. There are several other options on this page that will help you refine this group. When you’re done, QuickBooks will automatically generate them, and you can print or email them.


You’ll save a lot of time when you use QuickBooks’ sales forms. Your bookkeeping will also be more accurate, and it will be easier to track down specific transactions. If you use them conscientiously, you’ll be able to run reports that provide comprehensive overviews of various elements of your finances.


Do you have questions about any of this, or are you just getting started with QuickBooks? We’re happy to schedule a consultation to determine what your needs are and how we can assist. Contact us, and we’ll set something up.


SOCIAL MEDIA POSTS


Still creating sales forms manually? QuickBooks makes this task much simpler and faster. They’ll be easy to find, too. Find out how here.


Do you sometimes receive payment for products or services at the same time you provide them? QuickBooks can create sales receipts. Here’s how.


If you bill customers after you’ve provided a product or service, you can use QuickBooks’ invoice forms to collect your payments. Find out more here.

Did you know QuickBooks can help you create statements to send to customers who are past due on their payments? Find out how here.

Wednesday, March 4, 2020

Are You Following Best Practices in QuickBooks Online?

“Best practices” are recommendations for the most effective way to get things done. Are you following standard procedures in QuickBooks Online?


Habits can be good things when you’re talking about getting through the workday successfully. You might have developed a habit of responding to emails quickly and preparing checklists before you go into meetings. Maybe you schedule your most challenging work for high-energy times of the day and leave less-demanding tasks for those times when you’re not as chipper.


It’s easy to fall into habits with QuickBooks Online, too. You might follow the same workflow pattern every day simply because that’s the way you’ve always done things. There’s nothing wrong with that – as long as you’re incorporating as many of the site’s best practices as you can. That is, you’ve made a habit of taking actions that will lead to the most effective use of QuickBooks Online.


Here are four habits we think you should consider developing if you haven’t already.


Go through your new transactions every day:


One of the five best things about QuickBooks Online is its ability to connect to your financial accounts and import transactions regularly. But this feature is only useful if you review your recently-downloaded transactions every day. Wait too much longer than that, and it will become too overwhelming.


A screenshot of a cell phone

Description automatically generated
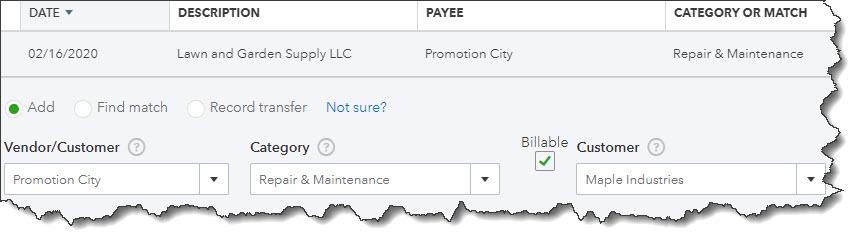
We recommend you review your account transactions every day and complete any of the fields necessary.


To view an account register, you’d click Banking in the left vertical pane, and then click on the desired account at the top of the screen. When you select a transaction, a small window like the (partial) one pictured above drops down and displays your options. If you have not worked with defining and clearing downloaded transactions before, we can provide guidance here. It’s complicated.


Always assign categories to expenses:


You’ll get out of QuickBooks Online what you put into it. That is, the more conscientious you are about completing records and transactions thoroughly, the more helpful your reports will be. It’s especially important that you assign categories to expenses and mark them as billable or not. Those categorized expenses will be very important as you’re preparing your company’s income taxes. And you want to be sure that customers are billed for expenses you incur on their behalf.


Run aging reports once or twice a week:


QuickBooks Online can help you keep up with money owed to you and money you owe, but you have to take the time to stay current with that information. The site’s Dashboard provides the dollar total for unpaid invoices and links to a list, but it doesn’t tell you what bills of your own may be coming due – or are late.


We recommend you run at least two reports at the beginning and end of the week: Accounts Receivable Aging Summary and Accounts Payable Aging Summary. You can modify these reports by clicking the Customize button, but they should be good as is. You don’t want to see any numbers in any columns except the first one (Current). If you see any beyond that, it means that either incoming or outgoing payments are overdue.  Click on any number to see the transactions behind it.


Set reorder points on inventory items.


A close up of a map

Description automatically generated
Inventory-tracking in QuickBooks Online is complicated. We can help you understand it.


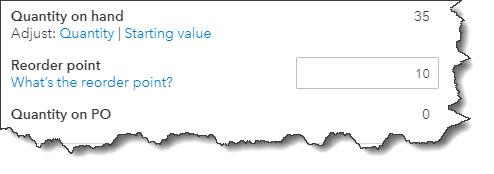
Keep an eagle eye on your product inventory levels. When you create an item record (Sales | Products and Services | New), be sure to enter a Reorder point. The Products and Services page tells you how many items have Low Stock or are Out of Stock. You can also see the Qty on Hand and Reorder Point in the table below those numbers.


Warning: Inventory-tracking is an advanced feature of QuickBooks Online. If you need these tools, contact us about scheduling some time to go over them thoroughly.


More to Implement


There are many other best practices that we’d recommend for your use of QuickBooks Online. Several of them have to do with reports, one of the site’s capabilities that is particularly robust but which many businesses don’t fully engage in because some of them are difficult to analyze. These include standard financial reports like Balance Sheet and Statement of Cash Flows


You’ll need these reports if you apply for financing or want to share information about your company’s financial health with a third party. The insight they provide can also be useful to you in making business decisions.  We’d be happy to create and analyze these for you on a regular basis, or to consult with you on any other aspect of QuickBooks Online that is perplexing.


SOCIAL MEDIA POSTS


QuickBooks Online has its own set of best practices that will make your accounting more effective. We share these with you here.


QuickBooks Online allows you to download transactions from financial institutions. It’s important that you view and approve these every day. Here is how.


Do you always assign categories to expenses and mark billable ones as such? It’s important for many reasons. We list them here.

QuickBooks Online can track inventory quite capably, but it’s a complex process. Let us help you if you’re planning to take this on. Find out more here.