It’s not as much fun as creating invoices, but the bills must be paid. Here’s how QuickBooks helps.
We’re in a bit of a transitional period with business bill-paying. Some paper bills still come via the U.S. Mail, however you may also be getting some through email. Others don’t come at all: You might get a reminder email, but you have to go to the vendor’s site to make a payment.
How do you keep track of it all so you don’t miss any due dates? You could record them on a calendar, but you’d still have to go back to the actual bill to retrieve the amount. But where is it? Is it online, in your email inbox, in a file folder, or hanging on the wall?
QuickBooks can organize this unpleasant process, saving time and helping you avoid confusion. Here’s how it works.
A 2-Step Process
QuickBooks divides your accounts payable tasks into two separate processes: entering bills and paying them. It requires some extra time upfront as you complete the first step, but streamlines the second so that the actual bill-paying only takes a few seconds.
To get started, click Enter Bills on QuickBooks’ home page to open a window like this:
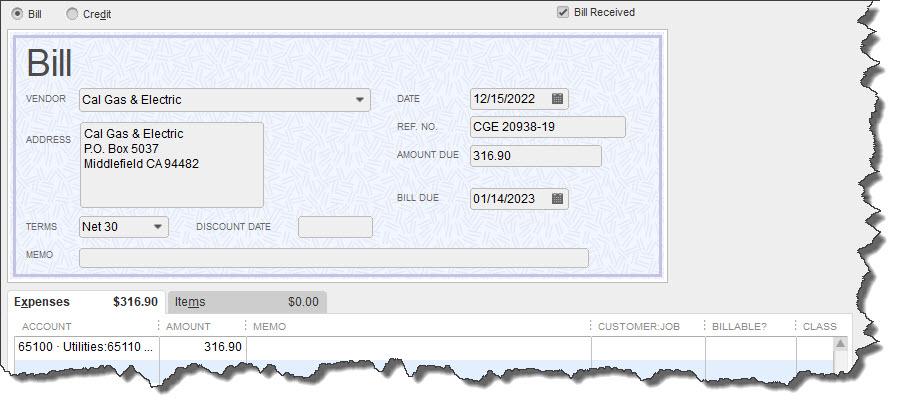
Before you can pay a bill in QuickBooks, you need to create a record for it.
The toolbar for the Enter Bills window is not pictured in the image above, but you don’t need it yet. Rather, you start by clicking the down arrow in the field next to VENDOR and selecting the biller’s name from your list (or clicking <Add New> if you haven’t yet created a record for that entity). The ADDRESS should fill in automatically, as should the date.
If you set up default payment TERMS in that vendor’s record, your preference should show in that field and the BILL DUE date should be correct. Enter the AMOUNT DUE and complete any of the optional fields that the transaction requires (REF. NO., DISCOUNT DATE, and MEMO).
Since this is a utility bill, the Expenses tab should be highlighted, and the amount you entered above should appear in it. Below that is the ACCOUNT field; open that list and choose the right one. Don’t worry about the CUSTOMER:JOB and BILLABLE fields. These will only be completed when you’re charging a customer for an expense or item.
Warning: If you’re not familiar with the concept of assigning accounts to transactions, please schedule some time with us. This is a critical designation that affects so many other areas of QuickBooks.
Saving Your Work

The toolbar from the Enter Bills window
Once you save your bill, you’ll be able to access it when it’s time to apply payment. How will you remember when it’s due, though? QuickBooks can remind you – or even pay it automatically. So, before you leave the Enter Bills window, click Memorize in the toolbar pictured above.
The Memorize Transaction window will open with your vendor already entered in the Name field. You’ll have three options here:
- Add to my Reminders list. QuickBooks can add this bill to its list of Reminders. To ensure that you’ll see this every time you open the software and can make any changes necessary, open the Edit menu and click Preferences | Reminders | My Preferences. Click in the box in front of Show Reminders List when opening a Company file. Then click the Company Preferences tab (if you’re the administrator) and find the Bills to Pay row. Click the appropriate button to indicate whether you want QuickBooks to Show Summary or Show List, and enter the number of days before due date.
- Do Not Remind Me. Just what it sounds like.
- Automate Transaction Entry. You can only select this if the transaction will be exactly the same every time (except for the date). If the number of transactions will be limited, enter the Number Remaining. And tell QuickBooks how many Days in Advance To Enter.
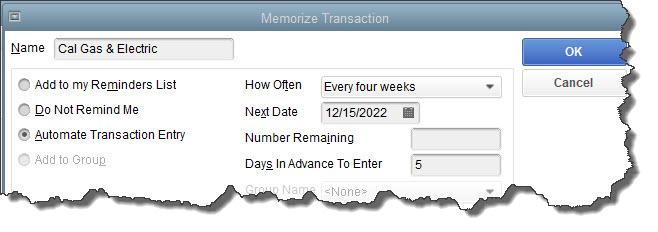
If you choose the third option here, be very careful when you define the automation. You should really only do this if you’re an advanced user.
When you’re done, click OK to close the box, and save the bill.
Next month, we’ll talk about the second step: the actual paying of bills. In the meantime, let us know if you want to schedule a session to go over any aspect of your accounts payable – or anything else in QuickBooks.
Social media posts
Are you missing bill due dates because you can’t seem to get your accounts payable organized? QuickBooks can help.
You can save an enormous amount of time and frustration if you use QuickBooks’ bill-paying tools. Are you familiar with how to do this? Ask us about this feature.
QuickBooks can remind you when your bill payments should be processed, or it can send them automatically. Let us help with setup.
Paying bills in QuickBooks is actually a two-step process. Once you’ve entered bills, paying them just takes a few seconds. We can show you how.
No comments:
Post a Comment