Wednesday, December 18, 2019

How to Clean Up QuickBooks for 2020

We know December is a busy month. However, take some time now to make sure QuickBooks is ready for 2020.


Yes, it’s here again: the end of the year. You probably have a lengthy to-do list full of tasks that must be done before December 31. There’s one task—or rather, a series of tasks—that you should definitely add to that list: year-end QuickBooks cleanup. Following the guidelines provided here will do three things. It will:
  • Ensure that you’ve processed every 2019 transaction (or that you know why you can’t).
  • Give you a sense of closure, knowing that you’ve dealt with all your 2019 financial data.
  • Allow you to start your 2020 QuickBooks activities with as clean of a slate as possible.


First Things First


Before you start looking at transactions and running reports, check to make sure that your fiscal year is recorded correctly in QuickBooks. Open the Company menu and select My Company. Click the pencil icon in the upper right to open the Company Information window, then click Report Information in the tabs to the left. This window opens:
A picture containing screenshot

Description automatically generated
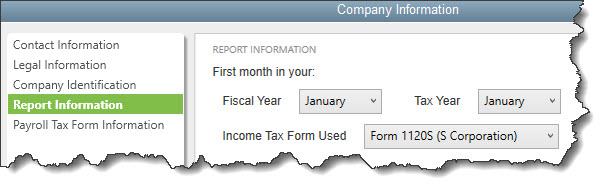
Is your company’s fiscal year recorded correctly in QuickBooks? If not, please contact us. Don’t try to fix this on your own.


Account For All Of Your Income


You certainly want to have received all the money owed to you by December 31 if at all possible. So, run a report to see which customers have outstanding, overdue balances. Open the Reports menu and select Customers & Receivables | A/R Aging Summary


The first column here will read Current. You don’t have to worry about these customers. It’s the next four columns that will require follow-up. If your default payment terms are 30 days, you’ll see columns for 1-30, 31-60, 61-90, and >90. Customers with dollar amounts in those columns have not met their obligations and are past due by those date ranges. 
Note: If your default terms are different (like 15 days), you’ll need to customize the report. In the toolbar at the top, you’ll see a field labeled Interval (days). Change it to reflect your own default terms and click Refresh in the upper right corner. 


If your report contains only a sea of zeroes in those four columns, everyone is paid up. If not, you can send statements to anyone who is at least one day past due to remind them of what they owe. Open the Customers menu and select Create Statements to see this window:
A screenshot of a cell phone

Description automatically generated
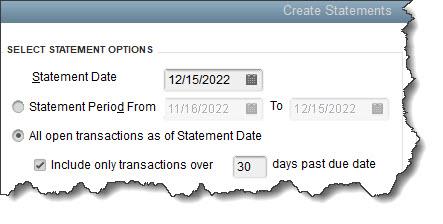
Partial view of the Create Statements window


Make sure the Statement Date is correct since QuickBooks will use this to calculate aging. Then you can either enter a specific Statement Period or request All open transactions as of Statement Date. If you choose the latter, you’ll most likely want to limit the statements to customers whose payments are overdue. So, you’d click in the box in front of Include only transactions over [your number here] days past due date.


Below these options, you’ll be able to indicate which customers should receive statements. The most common choice is All Customers (who fall into the group you just defined), but you can also send to one or multiple customers, for example. QuickBooks will display a list if you select one of these. The right pane of this window contains several additional options that you can check or uncheck. When you’re satisfied, you can Preview, Print, or E-mail the statements.


Pay Outstanding Bills


You should also try to settle your Accounts Payable before the end of the year. Open the Reports menu and select Vendors & Payables | A/P Aging Summary. Look for dollar amounts in the columns that show aging beyond the first column. You can also run the Unpaid Bills Detail report and look at the Aging column, as pictured here:
A screenshot of a cell phone

Description automatically generated
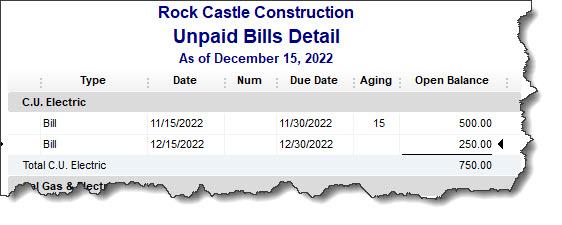
Look in the aging column of this report to see which bills are past due and by how many days.


Note: QuickBooks has multiple Preferences that relate to reports and aging. We can go over these with you if you haven’t explored them.
There are other tasks you should complete before December 31, some of which may require our assistance. These include reconciling all accounts, running year-end reports, and clearing any deposits that remain in the Undeposited Funds account. We’re here if you need us now, otherwise we can connect in the New Year.


SOCIAL MEDIA POSTS


2020 is just around the corner. Have you done your year-end QuickBooks tasks? We can help.


Before you start working with QuickBooks in 2020, make sure your 2019 work has been completed as thoroughly as possible. Find out more here and ask us how.


You supplied your fiscal year information when you started using QuickBooks, but are you sure it’s correct? Go to Company | My Company and click the pencil icon. Find out more year end tasks to have a clean slate for 2020 here.


Before December 31, look for any late customer payments and bills by running aging reports in QuickBooks as well as the following items we suggest to have a clean slate for 2020 here.

Wednesday, December 4, 2019

Have You Explored QuickBooks Online's New 2019 Features?

Intuit keeps innovating. Here are some of the changes the company introduced for QuickBooks Online in 2019.


Whether you can see them now or not, Intuit added and enhanced a ton of new features in 2019. Some of you may not see all of them until 2020, since the company typically rolls them out slowly.


So, if you’re not in one of the first waves of users, we want you to know what’s coming. It may also be that your version of QuickBooks Online has incorporated the changes, but you just haven’t noticed them. Here’s a rundown of what’s in store for everyone on the horizon.


A new location for the Create button


Previously, you clicked on the +(plus) sign in the upper right corner to open the Create window (invoice, sales receipt, bill, single time activity, etc.). Now, you’ll see a button marked +New in the upper left corner.


Instant Deposits


If you use QuickBooks Online Payments, you’ll be able to have available credit card and bank transfer payments from customers deposited in your bank account within 30 minutes for a 1 percent fee. The funds will be directed to your U.S.-issued Visa or MasterCard debit card.


Mileage Tracker


This is a tool previously found only in QuickBooks Self-Employed, but QuickBooks Online users will now have access to it. It does just what it sounds like: allows you to track business-related mileage so you’ll have a numerical total to enter when you come to that deduction on your income tax return. You can record trips manually by entering starting and ending addresses (or the total miles). Or, if you’re using the QuickBooks Mobile app, you’ll be able to turn on GPS and let your smartphone record the mileage automatically.
A picture containing text, map

Description automatically generated
QuickBooks Online’s Mileage Tracker allows you to record business miles driven manually or automatically and calculates your tax deduction.


New navigation tools in QuickBooks Mobile app


You’ve probably gotten used to navigating from a list of features in the QuickBooks Mobile app. You should soon see an entirely different look for navigation that uses icons representing common tasks (Transactions, Expenses, Mileage, etc.). These will appear when you click on the Shortcuts tab. You’ll find the remaining tools under the All tab.


Health benefit management


QuickBooks Online now allows you to compare, buy, and manage employee health, dental, and vision coverage.


Receipt Capture


Receipts can be the bane of a business owner’s existence. Many still use the “shoebox” method, tossing receipts in a box and entering them when tax time rolls around. Not a particularly elegant solution. Now, you can snap photos of receipts and move them into QuickBooks Online in one of three ways, by:
  • Scanning through the mobile app.
  • Uploading, then dragging and dropping.
  • Forwarding through email.


Receipts are automatically categorized and matched to transactions; if there’s no match, you can create a new transaction. Your receipts appear in the Receipts dashboard under the Banking tab.


Multilingual invoicing


Do you have international customers? If so, you may be able to send them invoices in their native languages. Besides English, QuickBooks Online now supports French, Spanish, Italian, Portuguese (Brazil), and Chinese (traditional).
A close up of a map

Description automatically generated
You can now send invoices to customers in any of six languages.


One-step contractor payments


You can now select trackable details like class, project, and location by making selections from drop-down lists in the contractor payments window.


Next-day deposits


If you’re a QuickBooks Online Payments subscriber, you’ll be able to get next-day access to payments customers have made to you via credit card or ACH. You’ll have to sign up for this service, and fees apply to ACH payments (1 percent of the total deposit, up to $10).


Auto-calculated sales tax


QuickBooks Online has streamlined the process of adding sales tax to sales forms – even if you’re a cash-basis business. After you’ve done some initial setup work, QuickBooks Sales Tax will do the necessary calculations and add sales tax automatically.


Hello, 2020


We hope that 2019 has been a good year for your business, and we wish you the best in 2020. If you’re still struggling to use QuickBooks Online to maximize productivity and make better business decisions, remember that we’re here to help. We can also advise you on any of the new features Intuit has introduced. Contact us anytime to set up a consultation.


SOCIAL MEDIA POSTS


QuickBooks Online now offers a Mileage Tracker. You can record tax-deductible mileage manually or automatically (using your phone’s GPS). We can show you how here.


Did you know that QuickBooks Online users can have customer payments deposited in their debit card-linked bank accounts instantly? Ask us and we can show you how. 


Do you have international customers? QuickBooks Online now allows you to create invoices in any of six different languages. Find out how here.

Applying sales tax to customers’ purchases in QuickBooks Online has gotten a lot easier. We can help you understand this enhanced feature.

Wednesday, November 20, 2019

Setting Up Sales Tax in QuickBooks, Part 2

Now that you have your sales taxes set up, you’ll be able to use them in transactions and reports.


Last month, we talked about the process of setting up sales taxes in QuickBooks. To recap a bit, you first have to go to Edit | Preferences | Sales Tax to make sure the software is set up correctly for this use. This means you’ll need to understand exactly what your state and local sales tax rules are. You can learn this by going to your state’s Department of Revenue or Department of Taxation website.


State sales taxes are considered Items in QuickBooks; you create them like you would create product records. When local sales taxes are also required, you can set up Sales Tax Groups. You’ll be assigning these Items as well as Tax Codes to customers.


Using Sales Taxes


Once you have sales taxes set up, you can start using them in transactions. You can create them on the fly from within transactions, but we recommend taking care of this important housekeeping task before you start.


Image1
QuickBooks applies the Sales Tax Item or Sales Tax Group that you assigned to the customer on your invoices. You can see the others that are available.


Start by creating an invoice. When you reach the Tax column for your first line item, you’ll see that QuickBooks has already assigned Tax or Non to it based on the information in the item’s record.  You can mix taxable and non-taxable items on the same invoice. You can also add a new sales tax on the fly from the invoice itself. Click the down arrow in the Tax column and select <Add New>


Be sure you’re not required to pay sales tax on an item when Non is selected. You may not have to charge sales tax on, for example:
  • Nonprofit organizations
  • Out-of state sales
  • Items that your customers will resell


Tip: If you’d like, you can create more specific sales tax codes for these situations. You could use OOS for out-of-state sales, for example, LBR for labor, and NPO for nonprofit organization.


Image2
QuickBooks already includes Sales Tax Codes Tax and Non, but you can add additional ones that are more descriptive.


Be very careful with your sales tax classifications in QuickBooks. As we said last month, such errors will be discovered in a sales tax audit, should you ever be subject to one. 


Once you’ve entered all the line items in the invoice, look down toward the bottom of the screen, directly beneath the table containing invoiced items and above the Total. QuickBooks will have calculated the sales tax due using the Sales Tax Item or Group you assigned to that customer during setup, placing it in the Tax field.


Look to the left of those numbers, and you’ll see the actual rate that was applied. To the left of that is a drop-down list containing the correct Sales Tax Item or Sales Tax Group. Click the down arrow if you want to see the list of other options. And in the lower left of the screen, you’ll see the Customer Tax Code.


The Sales Tax Center


Image3
The Manage Sales Tax window


When it’s time to pay sales taxes, you’ll open the Vendors menu and select Sales Tax | Manage Sales Tax. From the screen that opens, you’ll be able to:


  • Access Sales Tax Preferences.
  • Generate sales tax reports that will help you fill out required forms.
  • Visit related screens.


There are two reports you’ll need to run: Sales Tax Liability (displays total sales, amounts that are taxable and at what rates, taxes collected, and how much sales tax is due to each taxing agency) and the Sales Tax Revenue Summary (breaks down total sales into taxable and non-taxable). These reports are, of course, customizable, so you can filter them, for example, by Sales Tax Code.


A Delicate Balance


Collecting the correct amount of sales tax on taxable items and submitting the right tax totals to the right agencies takes vigilance. You don’t want to charge customers for unnecessary taxes, but you also don’t want to end up paying taxes you should have invoiced out of your own pocket. 


We can help you get this straight from the start. It’s much easier to spend some time setting up sales tax accurately in QuickBooks than it is to go back and untangle inaccurate records. Give us a call and we’ll set up a consultation.


SOCIAL MEDIA POSTS


QuickBooks lets you create Sales Tax Items on the fly, but it’s much better to make this task a part of your setup process. Here is why. 


Are you assigning Sales Tax Codes and Items to customers when you create their records in QuickBooks? You should be. Here is how.


If you want to make your QuickBooks Sales Tax Codes more descriptive, you can create your own three-letter designations. Find out how here.

QuickBooks reports can tell you how much sales tax you owe to each taxing agency, among other things. Find out how to here.

Wednesday, November 6, 2019

How to Create Projects in QuickBooks Online

If you’re using QuickBooks Online Plus or Advanced, you can create projects and track their profitability.


You already know how to determine whether your business is making or losing money overall: you run a Profit and Loss report. But what if you want to break this data down further? How can you tell whether the individual jobs you do for customers, with all their related income and costs, are profitable? 


This kind of insight can have an enormous impact on future business decisions about product and service pricing, worker costs, and expenses.  It can even signal whether or not you should take on specific jobs.
If you’re using QuickBooks Online Plus or Advanced, you can use their Project tools to calculate profitability. The theory is simple. You simply assign all relevant sales, time, and expenses to the project. QuickBooks Online will do the rest.


Getting Started


First, you’ll need to make sure that QuickBooks Online is ready to track projects. Click the gear icon in the upper right and select Account and Settings.  Click on the Advanced tab and go down to the Projects section. If this feature is turned Off, click the pencil icon over to the right, click in the box to turn it On, and Save this option.


To create a project, click on Projects on the home page and then on the New Project button over to the right. This panel will slide out from the right:


A close up of a map

Description automatically generated
Before you begin tracking a Project in QuickBooks Online, you’ll have to create a master record for it.


Enter a Project name in that field and select a Customer from the drop-down list (or <Add New>). Notes are optional but recommended. Click Save, and your new project will appear in a list on the Projects page. QuickBooks Online stores that information along with the customer in your company file and makes it available when you create, for example, invoices, checks, expenses records, and time activities. 


Linking Projects in Forms


Your project will appear in different places on different forms. On an invoice, it appears in the Customer drop-down list as a sub-item under the linked customer. You’ll select the project name rather than the customer to make sure the invoice was “tagged” to the project and wasn’t just a one-off bill. If you’re recording an expense, you’ll see a column for Customer/Project with other line items details.


There’s also another way to connect transactions to their related projects. On the Projects home page, click on a project name in the list. Click the Add to project button in the upper right and select the correct transaction from the list that drops down. In some cases, like invoices, the project will already have been selected and will appear in the Customer field.


If you enter a transaction and realize later that you forgot to connect it to a project, you can correct this in most cases (like expenses and bills) by going back to the original transaction and adding (or changing) the Customer/Project name. Invoices are tricky, though, depending on their status. We’d recommend you consult with us about this.


Understanding Profitability


A screenshot of a cell phone

Description automatically generated
You can see what your profit margin is on any project at any time.


After you’ve been entering project-related income and expenses for a while, you’ll probably be curious about whether or not you’re making money – even if the project is still in progress. To do this, open the Projects home page and click on the project name. The screen that opens (like in the image above) will be devoted to that one project. You can click on tabs to see:


  • An Overview that lists your income and costs, as well as your profit.
  • A list of related Transactions.
  • Time Activity records.
  • Project Reports (Project profitability, Time cost by employee or vendor, and Unbilled time and expenses).


We encourage you to use QuickBooks Online’s Project tools but would caution you about making changes to some existing transactions, especially invoices. We can help ensure that you’re on the right track with this feature. Contact us, and we’ll set up a consultation.


SOCIAL MEDIA POSTS


Did you know QuickBooks Online Plus and Advanced contain tools that help you create Projects and learn about their profitability? Find out more here.


Tracking project-related costs and income in QuickBooks Online involves “tagging” relevant transactions. Ask us about this.


If your business does jobs that have numerous costs and income associated with them, you can track them using QuickBooks Online’s Projects. Find out how here.

Don’t know whether you’re making money on individual jobs at your business? QuickBooks Online’s Projects tools can help. We can show you how.