Wednesday, July 17, 2019

Do You Need to Bundle Products in QuickBooks? Create Assemblies

If you frequently sell multiple inventory items grouped together, you need to learn about QuickBooks’ assemblies.


Let’s say you run a home improvement retail outlet, and one of the things you sell is doors. You might sell their parts—door frames, hinges, doorknobs, etc.—individually, in case a customer needs to replace a piece. You may also want to sell all of the individual components as a kit and give your buyer a price break for purchasing them all together.


QuickBooks calls these assemblies; sometimes they’re referred to as kits. Just as you’d create an individual inventory part, you can group related parts together and create an item that you would sell as a package.
A couple of caveats here. You can only build assemblies in QuickBooks Premier and above. If you need this feature and are using QuickBooks Pro, talk to us about upgrading. Second, we know that not all of you are using the latest versions of the software. We’ll use QuickBooks Premier 2018 in the examples here.


Under the Hood


Before you can start working with assemblies, check your QuickBooks settings to make sure they’re correct. Open the Edit menu and select Preferences, then Items & Inventory | Company Preferences. Click in the box in front of Inventory and purchase orders are active in it’s not already checked. If you want QuickBooks to deduct the quantity of items that have already been entered on sales orders, check that box (we recommend this, so you’re not selling items that have already been promised). Then make sure the button in front of When the quantity I want to sell exceeds Quantity Available is filled in, for the same reason.


A screenshot of a cell phone

Description automatically generated
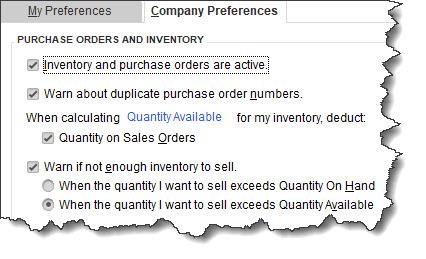
Before you start building assemblies, you’ll need to make sure your Company Preferences are marked accordingly.


Creating an Assembly Item


Open the Lists menu and select Item List. Open the drop-down list under Item in the lower left corner and click New. In the window that opens, click the down arrow under Type and select Inventory Assembly. Enter an Item Name/Number in the corresponding field in the window that opens. Don’t check the Subitem of or the I purchase this assembly item from a vendor boxes, and ignore Unit Of Measure.


Again, depending on the version of QuickBooks you’re using, you may see different fields in the Inventory Information box at the bottom of this window. But there are some standard elements you should find in this window no matter the version. They include:
  • Cost. How much does it cost you to purchase all of the parts for one assembly?
  • Sales Price. What will you charge your customers per kit?
  • COGS Account. “COGS” stands for Cost of Goods Sold. What account in the Chart of Accounts will you use to track the cost of producing your assemblies? Usually, the default one in QuickBooks is fine.
  • Income Account. Which account tracks your sales of this assembly?
  • Bill of Materials (BOM). This appears as a table in QuickBooks; it’s a list of all the individual inventory parts that make up the kit, along with their Cost (to you), QTY (quantity required for each assembly), and the total BOM Cost.


A screenshot of a social media post

Description automatically generated
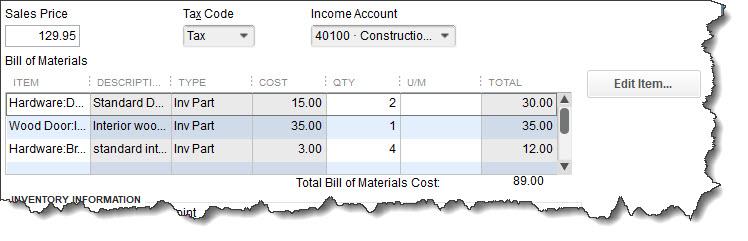
Your Bill of Materials Cost is the total of all inventory items required to create an assembly.


The Inventory Information box at the bottom of this window might contain fields for information like the Asset Account, quantity On Hand, and the number of items on purchase orders and sales orders. Once your inventory assembly is saved, it will appear in your Item List.


When you need to actually create kits, you’ll open the Vendors menu and select Inventory Activities, then Build Assemblies. You’ll select the Assembly Item from the drop-down list in the upper left corner, which will open a list of the components needed and their quantity on hand. You’d enter the number of kits you want (the maximum possible appears below the table) and then click one of the Build buttons. The next time you look at the kit in your Item List, you’ll see that its quantity has increased.


The concept of assemblies is easy to understand, but if you haven’t worked with accounts and inventory much, you may find creating kits in QuickBooks to be a bit of a challenge. Inventory levels can be a real problem if they get out of whack, and accounts must be assigned correctly to avoid inaccuracies in reports and taxes. We’d be happy to work with you as you get started with this task.


Social media posts


Do you sell inventory items in related bundles? QuickBooks helps you create and track assemblies (or kits). We can help you get started.


If you’re using QuickBooks Premier or above, you can create inventory assemblies to sell bundled items.


When you create an assembly of related inventory parts in QuickBooks, you can sell this kit as one item.


Do you know what a Bill of Materials (BOM) is? We can explain how it fits into the creation of assemblies in QuickBooks.

Wednesday, July 3, 2019

4 Things You Should Know About Advanced Settings in QuickBooks Online

Do you know about all of QuickBooks Online’s settings? What you’re missing may be important.


Looking through all the settings available in QuickBooks Online is something like reading the owner’s manual when you get a new car. You know you should do it, but you find yourself consulting it only when you encounter a problem.


Whether you’re new to QuickBooks Online, or you’ve been using it for a while, we recommend that you familiarize yourself with these important preferences.  Settings do more than turn features off and on: they can teach you about tools you might not have known were available.


Let’s explore some that you may have missed.


Closing the Books


You’ve probably heard this phrase before but do you know what it actually means in QuickBooks Online? When you set a closing date, you’re indicating that no transactions entered prior to that date should be changed.


Click the gear icon in the upper right, then select Your Company | Account and Settings. Scroll down to the Advanced section in the left vertical toolbar. Under the first heading, Accounting, check the box in front of Close the books. Enter a date and choose one of the two options for exceptions, as pictured in the image below:


A picture containing screenshot

Description automatically generated
You can close the books as of a specific date in QuickBooks Online so users can’t change transactions entered before then.


Warning: Talk to us before you make this decision. We can discuss the pros and cons.


Categories


QuickBooks Online offers a couple ways to categorize transactions so you can see related data in searches and reports. Scroll down to Categories and click on the Off button to the right of Track classes to turn this feature on. QuickBooks Online will then add a Class field to forms like invoices, along with a drop-down list that you can build with your own options. For example, you could create categories like departments, customer types, and product lines.  You can choose to assign classes to entire transactions or to individual rows in them, and you can ask to be warned if you try to save a form without selecting a Class.


Track locations works similarly. You can assign a location (territory, store, department, etc.) to each transaction if you’d like.


Automation
By using QuickBooks Online for your daily accounting tasks, you’re already saving time. But the site offers a way to save even more with its Automation tools. Here’s what you can do:
  • Pre-fill forms with previously entered content. Once you’ve saved a transaction for a customer, vendor, or employee, you can choose to have QuickBooks Online complete some fields in the next form you create for them.
  • Automatically apply credits. Do you want QuickBooks Online to apply credits to the next invoice you create for a given customer? Most businesses do, but a specific example of a time you wouldn’t check the box would be if you’re a property manager who requires security deposits.


A close up of a piece of paper

Description automatically generated
QuickBooks Online offers several automation options.


  • Automatically invoice unbilled activity. Be careful with this one. When you have customers with unbilled activity, QuickBooks Online can automatically create invoices for them on a schedule you designate. You have a few options here. You can simply ask for a reminder as the date approaches, or you can allow the site to automatically create invoices – with or without notifying you.
  • Automatically apply bill payments. When you record bill payments, QuickBooks Online can automatically apply them to the oldest recorded bill.


Time Tracking


Does your company sell services that are billed by the hour? If so, there are a couple of options you can turn on here. When you create timesheets or individual timed activities, you can add a Service field to the tracking form. You can also include a checkbox to indicate that a block of timed work is billable to customers. If you do the latter, you can opt in or out of letting users see the actual rate you’re charging customers.


Checking Your Work


QuickBooks Online refers to these as Advanced Settings for a reason. Making the wrong choices on any of them could lead to unhappy or confused customers and/or inaccuracies in your accounting file. We think you should know about these options, but we also hope you’ll schedule a consultation with us before attempting to set them up. It’s always much easier to spot problems in the making than to correct mistakes already made.


Social media posts


Have you explored QuickBooks Online’s Settings? You’ll learn about things you probably didn’t know the site could do for you.


If you don’t know what it means to “close the books” in QuickBooks Online, ask us. We can help you decide whether it’s good idea for you.


Do you need to categorize QuickBooks Online transactions by, for example, product lines or customer types? If so, you should explore the site’s Classes.

QuickBooks Online can automate many actions to save time. We can go over these with you to see if they’d work for your business.