Wednesday, February 19, 2020

Dealing with Deposits in QuickBooks

Where do the payments you receive in QuickBooks go? The software provides tools for managing deposits.


Recording payments, whether they come in to comply with an invoice you sent or are issued as sales receipts, is one of the more satisfying tasks you do in QuickBooks. The sales cycle is almost complete, and you’re about to have more money in the bank – once you document the payments as bank deposits.


Unless you use QuickBooks Payments, which moves your company’s remittances into an account automatically, you’ll have to deal with your deposits twice. First, you’ll have to make out a deposit slip for the bank. You’ll also need to record the deposit in QuickBooks itself.


Fortunately, the software makes this easy for you. Here’s how it works.


A Special Account


By default, QuickBooks transfers payments received into an account called Undeposited Funds. You can see it in your Chart of Accounts by clicking the Chart of Accounts icon on QuickBooks’ home page and scrolling down a bit. Look over to the end of the line and you’ll see its current balance. This account is an Other current asset. It holds your payments until you record them as deposits and take your money to the bank. 


When you’re getting ready to take cash and checks to the bank, click the Record Deposits icon on the home page. The Payments to Deposit window will open.


A screenshot of a cell phone

Description automatically generated
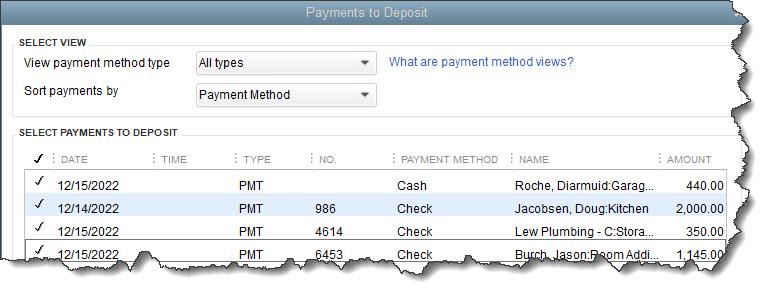
When money moves into Undeposited Funds from invoice payments or sales receipts, it’s displayed in the Payments to Deposit window.


We recommend completing your physical deposit slip first, based on the checks and cash you have in hand. Then, match them to payments in the window pictured above. You can click in front of each one you’ve matched to create a checkmark. When you’ve finished, click OK. The Make Deposits window will open. Make sure that the account you want to Deposit to is showing in the upper left corner. You can add a Memo and change the Date if needed.


Do you want cash back from your deposit? You may want to move this to Petty Cash, for example. Click the down arrow in the Cash goes back to field and select the correct account. Add a memo if necessary and enter the Cash back amount. When you’re done, save the transaction. QuickBooks now knows that you’re taking a deposit slip to the bank.


The total for your handwritten deposit slip and the final tally in the Make Deposits window should be the same. This will ensure that the amount deposited in your bank account will match the bank deposit amount in QuickBooks when reconciling. If you have leftover cash or checks, you’ll need to track down their origins and create new transactions. 


Checking Your Work


It’s a good idea to check your Undeposited Funds account occasionally to make sure that you haven’t left money undeposited. To do this, open your Chart of Accounts again. Right-click Undeposited Funds and click on QuickReport: [number] Undeposited Funds. All should be selected in the Date field in the upper left. Click on Customize Report and select the Filters tab. Scroll down in the Filters list and click on Cleared. Select No and click OK to display your report.


A screenshot of a cell phone

Description automatically generated
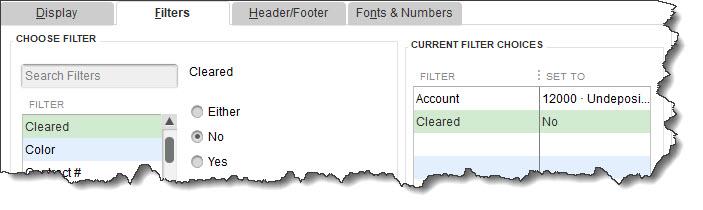
You can customize your QuickReport to see if you’ve neglected to deposit any payments. If this list contains any, open the Banking menu and select Make Deposits to follow the steps above again.


Changing Your Destination Account


As we’ve already mentioned, QuickBooks is set up to automatically move payments into Undeposited Funds. We recommend leaving it this way so you can easily check for money that hasn’t been deposited. You can change this, though. If you feel it’s necessary, let us know, and we’ll help you modify your destination account.


Working with Payment Methods


QuickBooks comes with a default set of payment methods. You can add to these and/or make existing ones inactive, so they don’t clutter up the drop-down list. Open the Lists menu and select Customer & Vendor Profile Lists | Payment Method List. If you don’t accept Discover cards, for example, right-click on that entry and select Make Payment Method Inactive. To add one, click the down arrow next to Payment Method and then New. The Payment Method should always match the Payment Type.


Precision Critical


Account reconciliation is difficult enough without having to deal with deposit discrepancies. Treat this element of your accounting with great care and let us know how we can help with account management, financial reporting or any other QuickBooks-related issues. We can troubleshoot – or even take over bookkeeping tasks that are vexing you.


SOCIAL MEDIA POSTS


Did you know that QuickBooks comes with an Undeposited Funds account? This is where the money from your invoice payments and sales receipts is recorded. Find out more here.


When you fill out a written bank deposit slip, you’ll need to match its content to transactions in QuickBooks. The software helps you do this. Here is how.


Did you know you can add Payment Methods in QuickBooks or make existing ones inactive to reduce clutter? We can show you how.


If you’re not using QuickBooks Payments, you’ll need to use the software’s deposit tools to make sure your accounts are accurate. Here is how to get started.

Wednesday, February 5, 2020

5 Things You Need to Know About Sales Taxes in QuickBooks Online

The most important thing you need to know about sales tax is that administering it correctly can be challenging. 


If you sold only one type of product to customers in one city, collecting and paying sales tax would be easy. But most businesses have a wider reach than that.


QuickBooks Online offers tools that allow you to set up sales tax rates and include sales tax on sales forms. Further, it calculates how much you must pay to state and local taxing agencies.


This is one of the most complicated areas in QuickBooks Online because you may have to deal with numerous taxing agencies. If you’re not already working with sales taxes, we strongly recommend you let us help you get everything set up correctly from the start. Taxing agencies can audit your recordkeeping and you want to make sure it is set up correctly. 


That said, here are five things we think you should know.


QuickBooks Online calculates sales tax rates based on:


  • Where you sell. Every state is different. If your business is located in Florida and you sell to a customer in Minnesota, you’ll be charging any sales tax levied by the state of Minnesota and possibly the city and county and other taxing authorities – if you have a connection, a “nexus” in that state (a physical location, active salesperson, etc.). 
  • What you sell
  • To whom you sell. Some customers (like nonprofit organizations) do not have to pay sales tax. You’ll need to edit their customer records to reflect this in QBO. Open a customer record and click the Edit link in the upper right. Click the Tax info tab and make sure there’s no checkmark in the box that says This customer is taxable. The Default tax code will be grayed out, and you can enter Exemption details in that field. 


A picture containing screenshot

Description automatically generated
Customer records for exempt organizations should contain details for that exemption. You’ll need to see their exemption certificate or at least know its official number.


Intuit now offers a revamped version of QuickBooks Online’s sales tax features.


At some point, you’ll be asked if you want to switch to the new, more automated system.  The actual mechanics of the process are simple, but you’ll be moving historical and in-process data to a new structure. If you have sales tax set up right now and your situation is at all complicated, you’re going to want our help with the transition.


This enhanced feature only supports accrual accounting.


You can combine individual tax rates.


If you are required to pay city, county, and state sales tax rates for a particular customer, for example, you can create a Combined tax rate that contains all of the individual components. The customer will only see the total on an invoice or sales receipt, but QuickBooks Online will track each one accordingly for payment and reporting purposes


A screenshot of a cell phone

Description automatically generated 
You can combine sales tax rates in QuickBooks Online (image above from current Sales Tax Center in QuickBooks Online, not the enhanced one).


Product and service records should contain sales tax information.


This is another area that will require some research. Just as some services are subject to tax, some products are not (like groceries in Arizona). So, you’ll need to find out what the rules are for what you sell. You can find this information on the website of the state’s Department of Revenue (sometimes called the Department of Taxation).


Once you know, you can record that status in QuickBooks Online. Open a product record by going to Sales | Products and Services and clicking Edit in the Action column or create a new one by clicking New in the upper right. Scroll down to Sales tax category in the record. You can choose between Taxable – standard rate and Nontaxable


There’s a third option here: special category. This gets complicated. We can help you determine whether it applies to you.


QuickBooks Online tracks the sales tax you owe.


You can see what you owe to each agency by running the Sales Tax Liability Report, and record payments when you’ve made them. Summary and detail versions of the Taxable Sales report are also available.


Once you get sales taxes set up in QuickBooks Online, it’s easy to add them to the relevant sales forms. Getting to that point, though, takes time, study, and careful attention to detail. If you’re getting ready to sell, or you’re already selling and struggling with sales taxes, let us know. We can schedule an initial consultation to see how we can be of assistance.


SOCIAL MEDIA POSTS


Did you know that QuickBooks Online can calculate and apply sales taxes to transactions? However, setup requires some upfront research. Here are a few things to get started.


Does your business have to charge multiple levels of sales taxes? QuickBooks Online allows you to combine them. Here’s how.


QuickBooks Online calculates sales taxes based on where and what you sell, and to whom. It’s a bit complicated and here is why. We can help you get through setup.


Did you know that Intuit has released an enhanced version of QuickBooks Online’s Sales Tax Center? Here are the details and we can help you make the transition.