Wednesday, October 23, 2019

Setting Up Sales Taxes in QuickBooks, Part 1

If your business is required to collect and pay sales taxes, you can use QuickBooks’ tools to help you meet those obligations. 


Next to payroll, state sales taxes represent probably the most complex element of your accounting tasks. QuickBooks can help with the mechanics, but there’s a lot you need to learn before you can start charging and paying them. For example:
  • Is your company located in a destination-based or origin-based state where taxes are concerned (do you charge sales tax based on where your customers are or where you are)? 
  • Certain types of items and services are exempt from sales tax. Are yours?
  • What local taxes (city, county, etc.) must you collect, if any?
  • How often must you submit what you owe, and to what agency?


If you don’t know your state’s rules, search for your Department of Revenue (sometimes called the Department of Taxation) on Google. Or talk to us about this whole complicated process. You can’t begin to work with sales taxes in QuickBooks until you know the answers to many questions.


First Steps


Once you know what your state’s rules are, you can start setting up the sales taxes you’re required to collect and pay. Open the Edit menu and select Preferences. Click on Sales Tax, then Company Preferences. Make sure the Yes button is highlighted next to Do you charge sales tax?, then click on Add sales tax item. You’ll see this window:
A screenshot of a cell phone

Description automatically generated
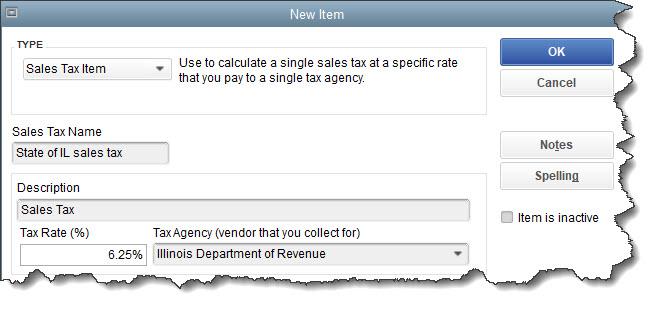
In states where it’s required, you may have to at least set up a state sales tax item in QuickBooks. You may also be responsible for local (city, county, etc.) taxes.


TYPE should already be set to Sales Tax Item. Enter a name for your tax in the Sales Tax Name field; the Description should automatically appear as Sales Tax. Type in the Tax Rate (%) and the name of the Tax Agency that will collect it (select <Add New> if it’s not there already). Click OK to return to Company Preferences and continue to define additional tax rates. If there is a sales tax item you use frequently, you can select it from the Your most common sales tax item field. 


Tip: Each sales tax rate is considered an Item in QuickBooks. When you have to edit or delete one, open the Lists menu and select Item List. Type sales tax in the Look for box, then Search. Right-click on your target and select your desired action from the local menu that appears.


Sales Tax Groups


When you want to combine multiple sales taxes as one item (state, county, etc.), click Add sales tax item again in Company Preferences and choose Sales Tax Group. Enter a Group Name/Number and Description. In the table below, click the down arrow in the field in the TAX ITEM column. Keep selecting individual tax rates until you’re finished, then click OK. When you use one of these groups in a transaction, the customer will only see the total tax, but reports will break them down into their individual parts.


Completing Your Preferences


The bottom half of the Company Preferences screen needs more information. 
A screenshot of a cell phone

Description automatically generated
It’s important that all the entries at the bottom of the Company Preferences screen are correct before you start working with sales taxes in QuickBooks.


The first two items here are simply field labels that will appear in transactions to indicate whether or not a line item should be taxed. You should leave them as is; they’re automatically created by QuickBooks. If you want to Identify taxable amounts as “T” for Taxable when printing, click in that box to make a checkmark. 


Is your QuickBooks company file set up on a cash or accrual basis? Click on the button in front of the correct choice. WHEN DO YOU PAY SALES TAX is a question that will be answered as you’re learning about your state’s sales tax requirements. When you’ve completed this section, click OK.


Assigning Tax Codes
As you create item and service records in QuickBooks, you’ll be asked to indicate whether or not they’re taxable. The Tax Code field appears at the bottom of the window, like in the image below.
A screenshot of a cell phone

Description automatically generated 
You’ll need to designate every item or service you sell as taxable or non-taxable.


There’s much more you need to know about collecting and submitting sales taxes, like how to work with transactions and reports. We’ll cover those topics next month. In the meantime, let us know if we can help you set up your QuickBooks company file for this complex task.


SOCIAL MEDIA POSTS


Do you need to collect and pay sales taxes on items and/or services you sell? QuickBooks can help with this task.


Don’t know what the rules are about collecting sales taxes in your state and local area? Google your state’s Department of Revenue then find out how QuickBooks can help with this task.


Did you know sales taxes are considered Items in QuickBooks? You can see your options and start creating them by going to Edit | Preferences | Sales Tax. Find out more here.

Taxing agencies often perform sales tax audits. Would you be prepared if you were the subject of one? We can show you how QuickBooks can help.

Wednesday, October 9, 2019

Who Owes You? 5 QuickBooks Online Reports That Can Tell You Fast

Keep a constant watch on your accounts receivable to improve cash flow.


Quick: How many of your invoices are unpaid? Have any of your customers gone over 30 days past due? Did you bill all of the time and expenses for that project you just completed for a customer? 


If you’re doing your accounting manually, there’s simply no way to get that information quickly. Depending on your bookkeeping system, you may not be able to get it at all.


QuickBooks Online has more than one solution for this problem. You see the first one every time you log in. The Dashboard contains a graphic in the upper left corner that tells you how many invoices are overdue and unpaid. Click on the colored bar labeled OVERDUE, and you’ll see a list of invoices with the unpaid ones right at the top.


A screenshot of a cell phone

Description automatically generated
You can tell at a glance how much of your money is tied up in unpaid invoices.


While this is important information for you to have as you start your workday, it doesn’t tell the whole story. To get that, you’ll need to access some of QuickBooks Online’s reports – five of them in particular. Click Reports in the left vertical pane, and then scroll down to the heading labeled Who owes you


These reports are listed in two columns. Each has the outline of a star next to it. Click on the star, and the report will be added to the Favorites list at the top of the page. Click on the three vertical dots next to it, and you’ll be able to Customize the report. And as you hover over the title, you’ll see a small, circled question mark. Click on this to get a brief description of the report.


There are several reports in this list that can provide insight into where your outstanding revenue is. We recommend you run five of them at least once a week – more frequently if your business sells large quantities of products and/or services. The suggested are:


Accounts receivable aging detail


This report provides a list of invoices that are overdue, along with aging information. There are several columns in the report, but you’ll want to pay special attention to the last one: OPEN BALANCE.


Tip: If you have many customers or simply a high volume of unpaid invoices, you might consider running the Accounts receivable aging summary instead.


Changing the Content


Before you run the report, you should explore the customization tools provided for it. They won’t be the same for every report, but you can start to get an idea of what can be done. Hover over the report title and click Customize. A panel like the one pictured below will slide out of the right side of the screen.
A close up of a piece of paper

Description automatically generated
QuickBooks Online provides deep customization tools for reports.


You can see some of your customization options in the image above. Beyond these, you can also work with filters and headers/footers. When you’re satisfied with your changes, click Run report.


If you want to run a report with its default settings, just click on the report title in the list to display it.  You’ll have access to limited customization from there. 


Four other reports you should be generating regularly are:
  • Customer Balance Summary: Shows you how much each customer owes your business
  • Open Invoices: Lists invoices for which there has been no payment
  • Unbilled Charges: Just what it sounds like: tells you who hasn’t been invoiced yet for billable charges
  • Unbilled Time: Lists all billable time not yet invoiced


We don’t expect you’ll have any trouble understanding reports like these; they’re fairly self-explanatory. QuickBooks Online offers many other reports, the standard financial reports that need to be generated monthly or quarterly, like Balance Sheet, Profit and Loss, and Statement of Cash Flows. You’ll absolutely need these should you apply for a loan or need to supply in-depth financials for any other reason. We can help you analyze them to get a comprehensive, detailed picture of your company’s fiscal health.


SOCIAL MEDIA POSTS


Can you determine who owes you money—and how much—in just a few seconds? QuickBooks Online can. Find out how here.


QuickBooks Online’s Dashboard gives you an instant rundown on unpaid invoices. Do you know where to look? Find out how here.


One of the easiest ways to improve cash flow is by running a handful of accounts receivable reports in QuickBooks Online. We can show you how here.

Have you invoiced customers for all billable time and expenses? QuickBooks Online reports can tell you quickly in just a few easy steps. Find out how.