Wednesday, August 21, 2019

Using QuickBooks' Bill Tracker

If your business pays a lot of bills, you need an efficient system for staying current with them. QuickBooks’ Bill Tracker provides that.


Bill-paying may be your least favorite accounting activity. You definitely know how those checks and online payments affect your account balances, but it’s more than that. Staying up to date with your bills and paying them on time (but not too early) takes a supreme organizational effort.


If you’re using a manual bookkeeping system, you know how difficult it is to keep up. QuickBooks offers several options for helping you with this. You can set reminders and/or put the due dates on your calendar. If you’re using QuickBooks 2016 or later, you have access to another tool: Bill Tracker


A Comprehensive Overview


QuickBooks Bill Tracker is similar to the software’s Income Tracker. If you’ve used that, you know that it provides a way to get a birds-eye view of your accounts receivable. You can see where every transaction falls in your income “pipeline” (estimates, open invoices, etc.). 


Bill Tracker works similarly, but for accounts payable. It has two advantages over just opening your Vendor Center and clicking the Transactions tab. First, it displays the Status of each transaction. Second, it contains Action links, so you can do more than simply open each entry.


A screenshot of a cell phone

Description automatically generated
Bill Tracker lets you switch between lists of different types of accounts payable transactions.


To open this tool, click Bill Tracker in your navigation pane. The screen that appears consists of two parts. Color-coded bars across the top represent different transaction types, Purchase Orders and Bills. The latter is further divided into Open Bills, Overdue, and Paid In The Last 30 Days. Each bar contains both the number of transactions that fall in that category and their total dollar amount.  Click on one, and the list below changes to include only that type of entry.


Note: You can see in the image above that the Open Bills list has three alternate views that you can open by clicking on them in the drop-down list: Item Receipt, Credit, and Unapplied Payments. If you have questions on any of these, we can explain them to you, since you should know when to consult these lists. 


Changing the View


Bill Tracker defaults to the broadest view possible. That is, when you select a category of transactions, it shows all of the active ones. But a series of drop-down lists below the main toolbar gives you control over what subset of information is displayed there. You can narrow your list down to one vendor, for example, and choose a date range.


Data columns are different for each list. When you’re displaying Overdue transactions, the labels read Vendor, Type, Number, Date, Due Date, Aging, Status, Amount, Open Balance, and Action. You get a thorough description of each entry at a glance.


Taking Action


As we said earlier, Bill Tracker lets you work with transactions as well as just view them. Click on Purchase Orders and open the drop-down list at the end of one of the rows in the Action column. You can see in the image below what your options are there, including Convert to Bill. When the Open Bills list is active, you’ll be able to click on Pay Bill.


A screenshot of a social media post

Description automatically generated
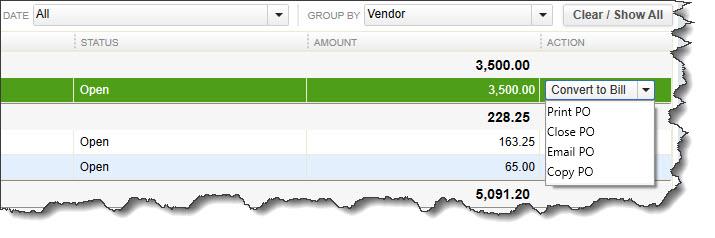
Open the drop-down list in the Action column to see what you can do with the selected transaction.


To see what else you can do with individual transactions or groups of them, look in the lower left corner of the screen and locate the Batch Actions and Manage Transactions buttons. With the Purchase Orders list open, click in the box in front of one or more to create a checkmark. Open the Batch Actions menu. You’ll see that only two options are available to you here; the others are grayed out. You can Print Selected Purchase Orders or Close Purchase Orders. Pay Bills is only active when you’re in a list that allows that.


Now, open the Manage Transactions list. You can create transactions from this menu by clicking on Purchase Order, Bill, CC Charge, or Check. If you select Edit Highlighted Row, the original transaction will open.


Warning: Remember that you should never write a check to pay a bill if you’re using QuickBooks’ bill-payment tools. If you’ve already entered the bill, click Pay Bills on the home page or open the Vendors menu and select Pay Bills. Talk to us if you have questions about this process.


QuickBooks offers multiple ways to take the same actions in accounts payable; Bill Tracker is just one. But this instant overview can tell you quickly where you stand with your vendors -- and help you avoid late payments.  


Social media posts


Did you know QuickBooks provides many ways to help you pay bills on time? Bill Tracker is one of them. Here is an overview on this useful feature.


QuickBooks’ Bill Tracker gives you an instant overview of your active accounts payable transactions. Are you using this useful feature? We can show you how.


If you’re using QuickBooks’ bill-paying tools, never write a check to pay a bill. You must use the Enter Bills and Pay Bills links. Find out how here.

QuickBooks’ Bill Tracker lets you work with accounts receivable transactions as well as view them. Find out more here and ask us about how this useful feature can help you.

Wednesday, August 7, 2019

Need Advanced Time-Tracking? Connect QuickBooks Online to An App

You can track the hours employees work in QuickBooks Online. But if your time-tracking needs are complex enough, you’ll need an integrated app.


If your company has a staff and sells services, you know better than anyone that time is money. It’s critical that you track every minute that employees work, as well as those that can be billed to customers. QuickBooks Online offers dedicated tools that let you do just those tasks.


But QuickBooks Online has limitations in that area, and you may need more versatile time-tracking than it provides. There’s a solution for that: add an integrated add-on application. Several are available that go above and beyond in the area of employee time management. If you’re interested in exploring these online solutions, we can help you both find and get started with the right one.


What QBO Can Do


QuickBooks Online’s own time-tracking features are easy to set up and use – but you must be sure they’re turned on. Click the gear icon in the upper right, then Account and Settings under Your Company. Click on the Advanced tab and go down to the Time Tracking section. The first two entries here should be checked; if they’re not, click in the boxes. If you don’t want employees to see how much customers are actually being billed for their time, keep that box unchecked. Change the First day of work week if you want and click Save.


A close up of a piece of paper

Description automatically generated 
If you’re going to track hours worked by employees and bill them to customers, these two boxes need to be checked.


Once time-tracking is enabled, you’ll be able to enter single timed activities and/or fill in timesheets., marking them as billable where appropriate. Employees will be able to enter their own hours on timesheets, and billable hours can be easily transferred to customer invoices. 


Adding an Add-On


As we said earlier, there are numerous advanced add-on time-tracking applications that can be integrated with QuickBooks Online. They contain built-in tools to facilitate their actual connections with QBO, and they know what data needs to be exchanged and synchronized. Hours captured on timesheets go directly into QuickBooks Online, which transfers billable hours to customer invoices and uses the data in job costing and payroll.


Here’s an example of how the setup process works in one of the most popular apps, TSheets. Once you’ve created an account (a 14-day free trial is available), you’ll click on the Feature Add-ons link in the lower left, then Manage Add-ons. Select QuickBooks Online from the list and click Connect to QuickBooks. Click Connect again to establish the link. TSheets then asks some questions about your import preferences. When you’ve designated those and clicked on Start Import, TSheets will import your employees, customers, service items, and other data you’ve specified from QuickBooks Online.


You may need our help with one task in particular: setting up the Payroll Item Mapping Tool. This ensures that your pay types (salary, overtime, etc.) match those in QuickBooks Online. There are many other internal settings that will require your attention before you start using TSheets. 


A screenshot of a cell phone

Description automatically generated
You can fine-tune your time-tracking app’s settings, as in the above image from TSheets.


Sophisticated Tools


TSheets and other QBO-friendly time-tracking applications have their own unique set of features, but they all focus on getting your employees paid for their work and your company paid by customers who use your services – accurately and in documented detail. Prices vary, but they generally charge a monthly base fee and an additional monthly fee for each user.


Employees can, for example:
  • Punch into and out of specific jobs on a virtual time clock (desktop or mobile). Facial recognition adds another layer of security.
  • Use time cards or timers to record work hours.
  • Record their breaks and time off based on the stated company policies.
  • Track time when wifi or cellular service is not available.


Managers can:
  • Access and approve timesheets from the mobile app.
  • Schedule shifts and assign employees to them.
  • See who’s working (and on what) and locate them via GPS tracking.
  • Generate real-time, live reports.


Keep in mind that when you add an app to QuickBooks Online, you’re essentially having to learn how to use an unfamiliar website or program. Since they touch both payroll and customer billing, time-tracking applications must be understood thoroughly and used with precision. So if your needs go beyond what QuickBooks Online can do, let us help you select and implement the right app for you. 


Social media posts


Did you know QuickBooks Online lets you track employee hours worked and bill them to customers where necessary? We can help you use these tools – here is how.


QuickBooks Online’s time-tracking capabilities only go so far. If you need more than it offers, ask us about the many integrated add-on apps now available.


Did you know that there are numerous time-tracking add-ons for QuickBooks Online that offer sophisticated features? We can help you implement the one right for your needs.

Time-tracking add-ons for QuickBooks Online help both employers and employees easily capture hours worked.  Find out how here – and ask us about which one is right for you.